Getting Started
Installation
To get started, first download the application from the releases page. Then, follow the instructions below to set up the application. Downloads are available for Windows, macOS, and Linux.
Set up your cloud provider
- Amazon Web Services
- Google Cloud Platform
- Log in to the Amazon Web Services console
- Navigate to the AWS Identity and Access Management (IAM) console
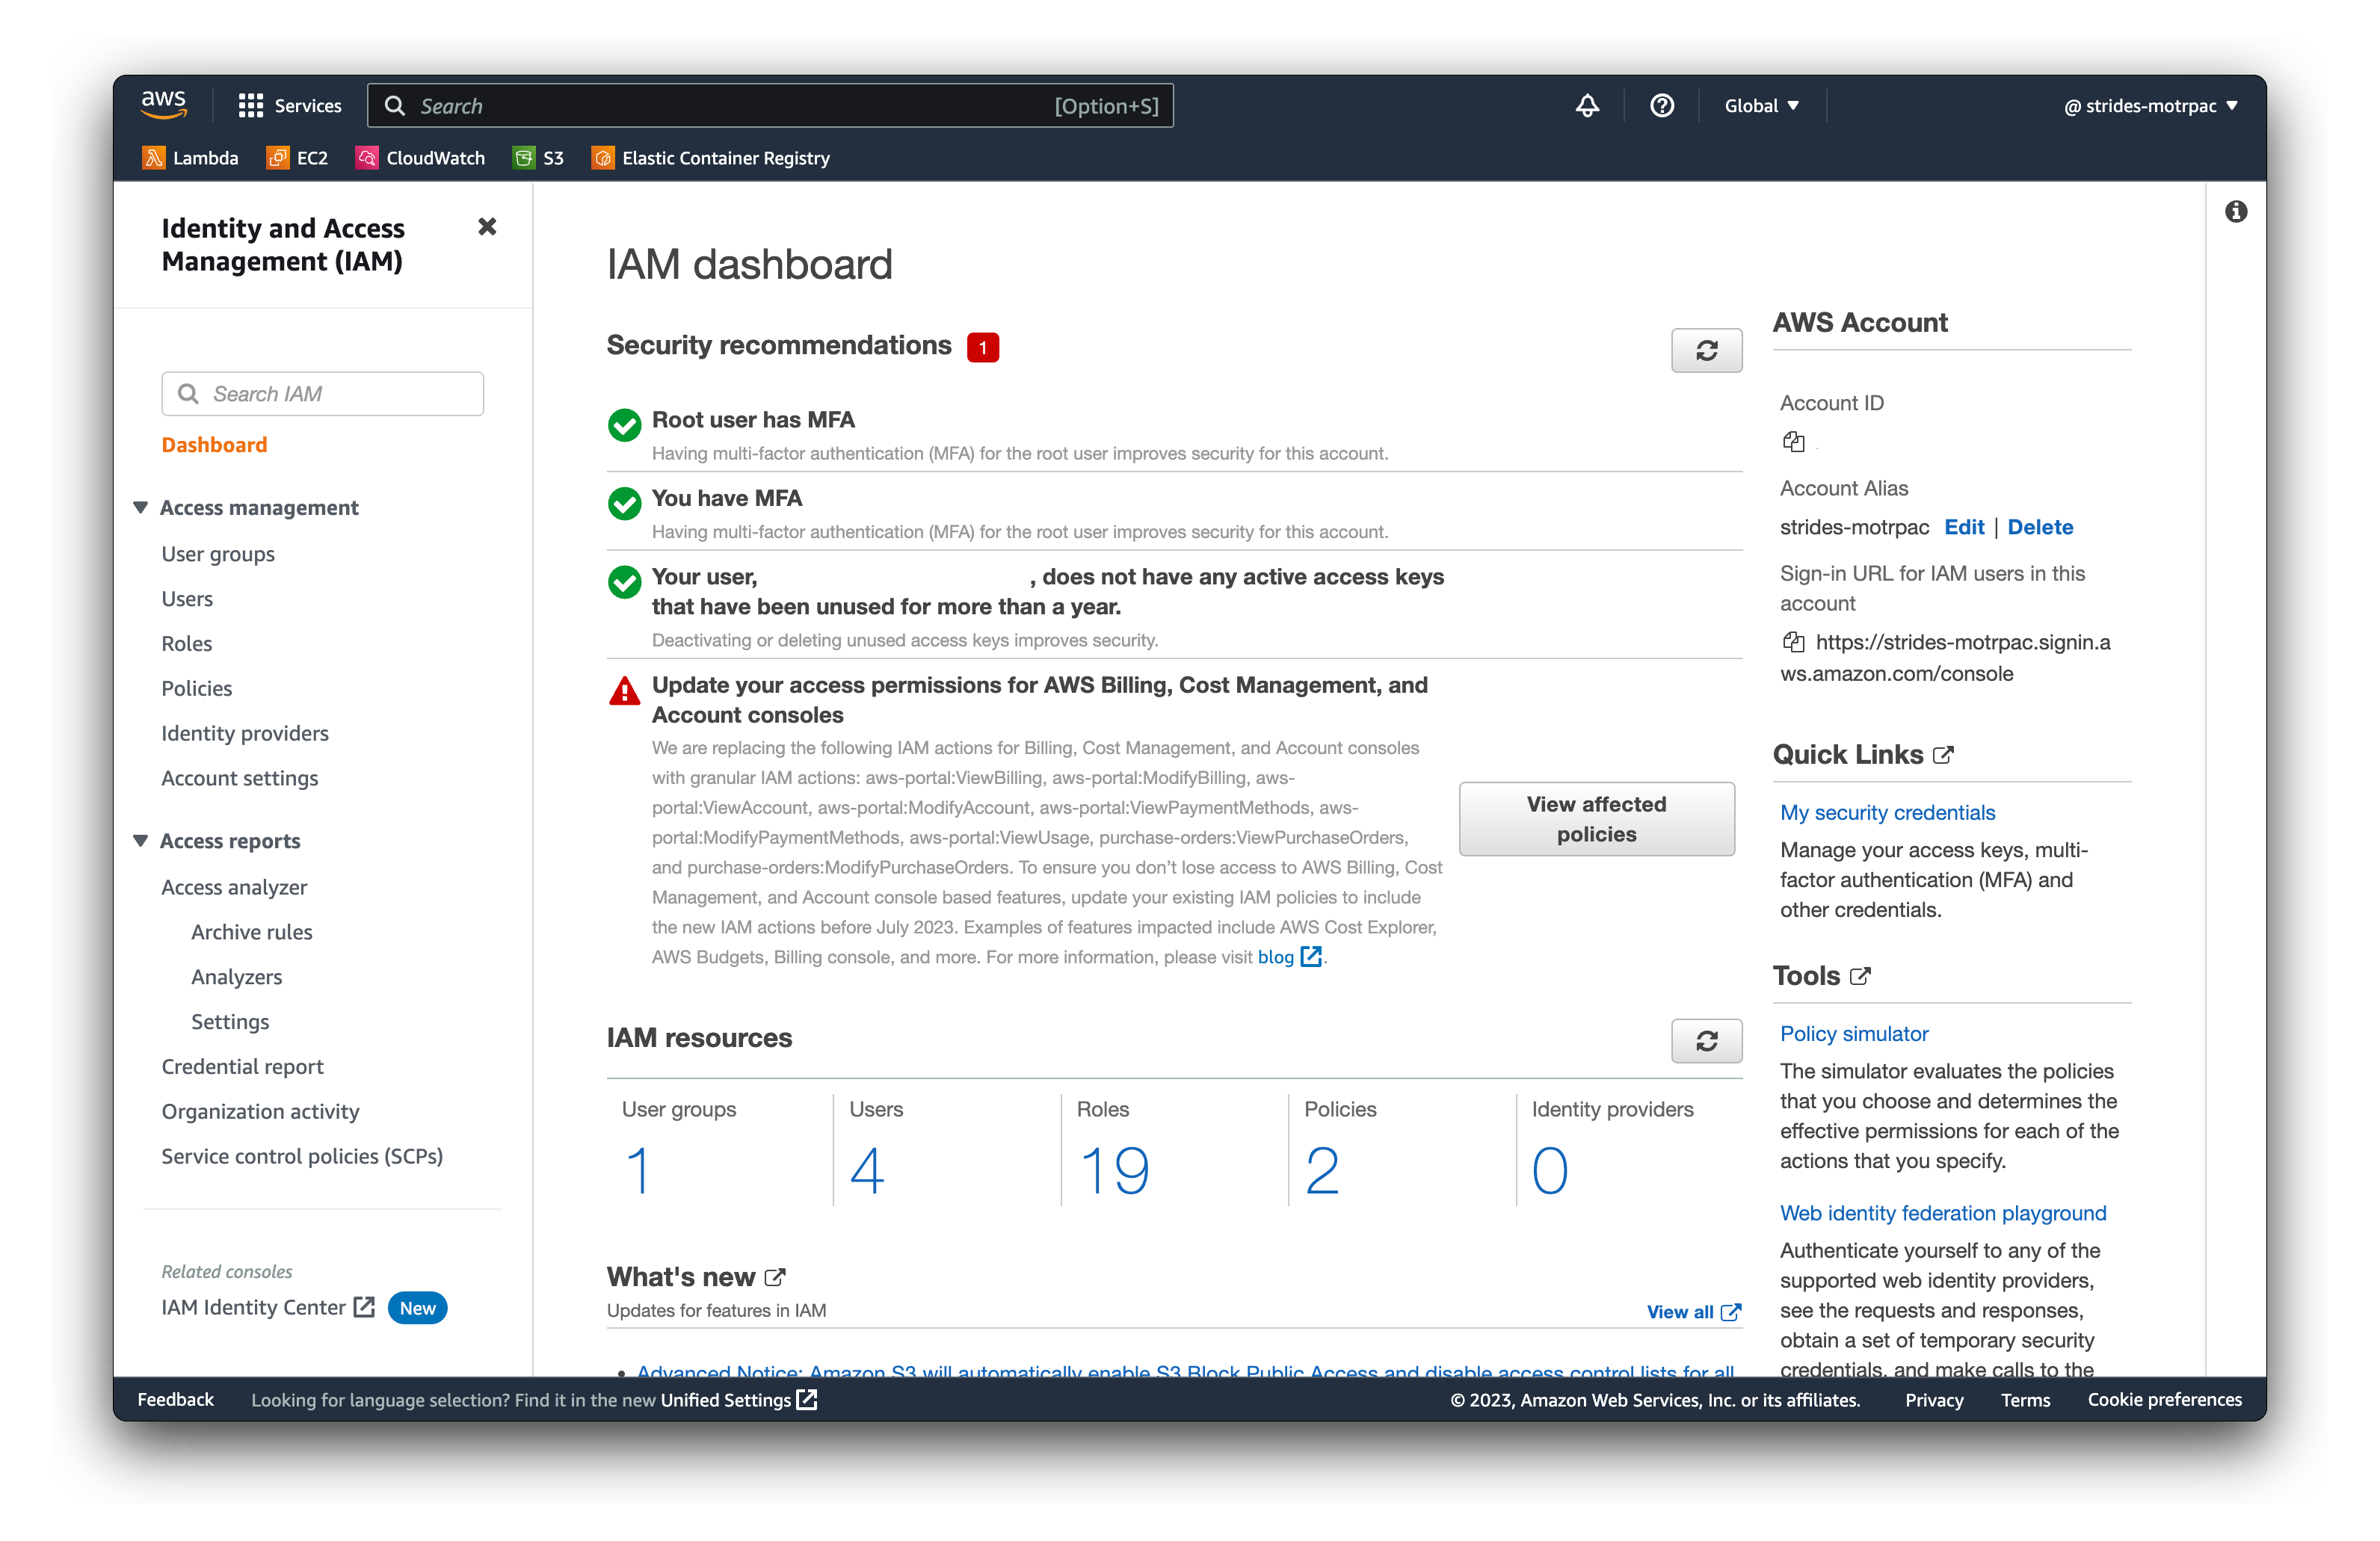
- Click on Users in the left sidebar
- Click on Add user
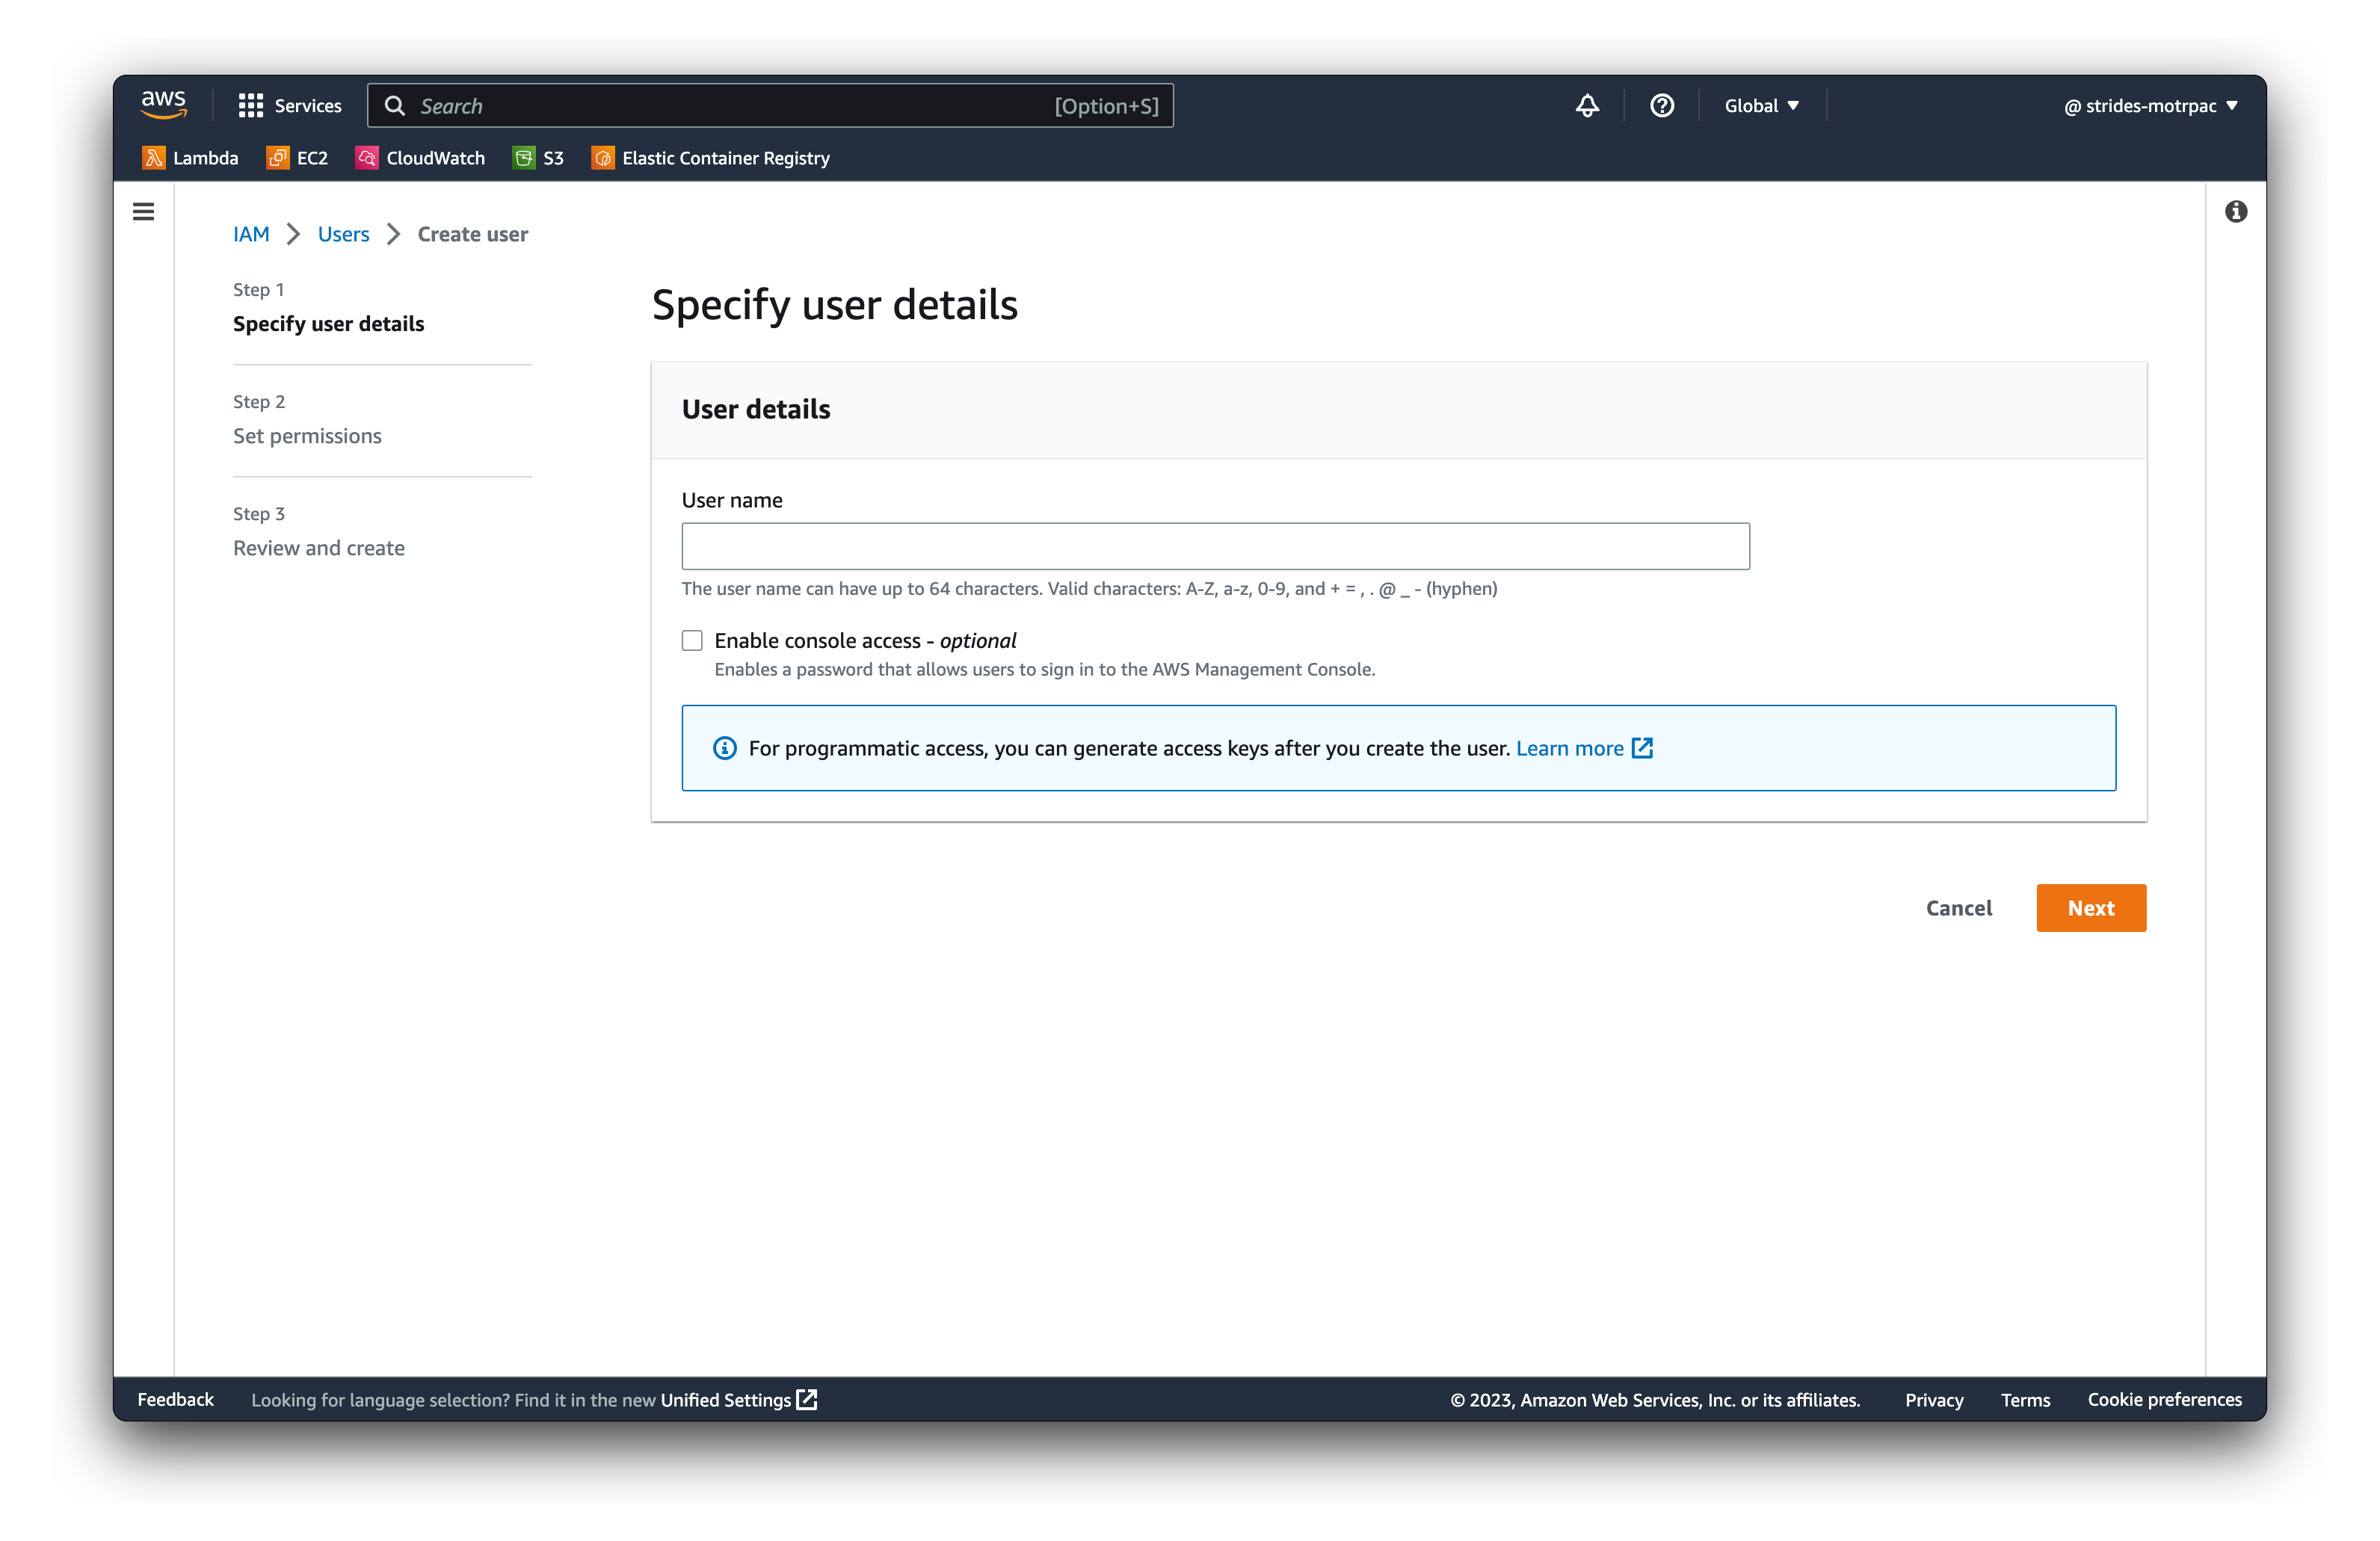
- Enter a username - this will be used to identify the creator of all resources in your account
- Click on Next
- Click on Attach existing policies directly
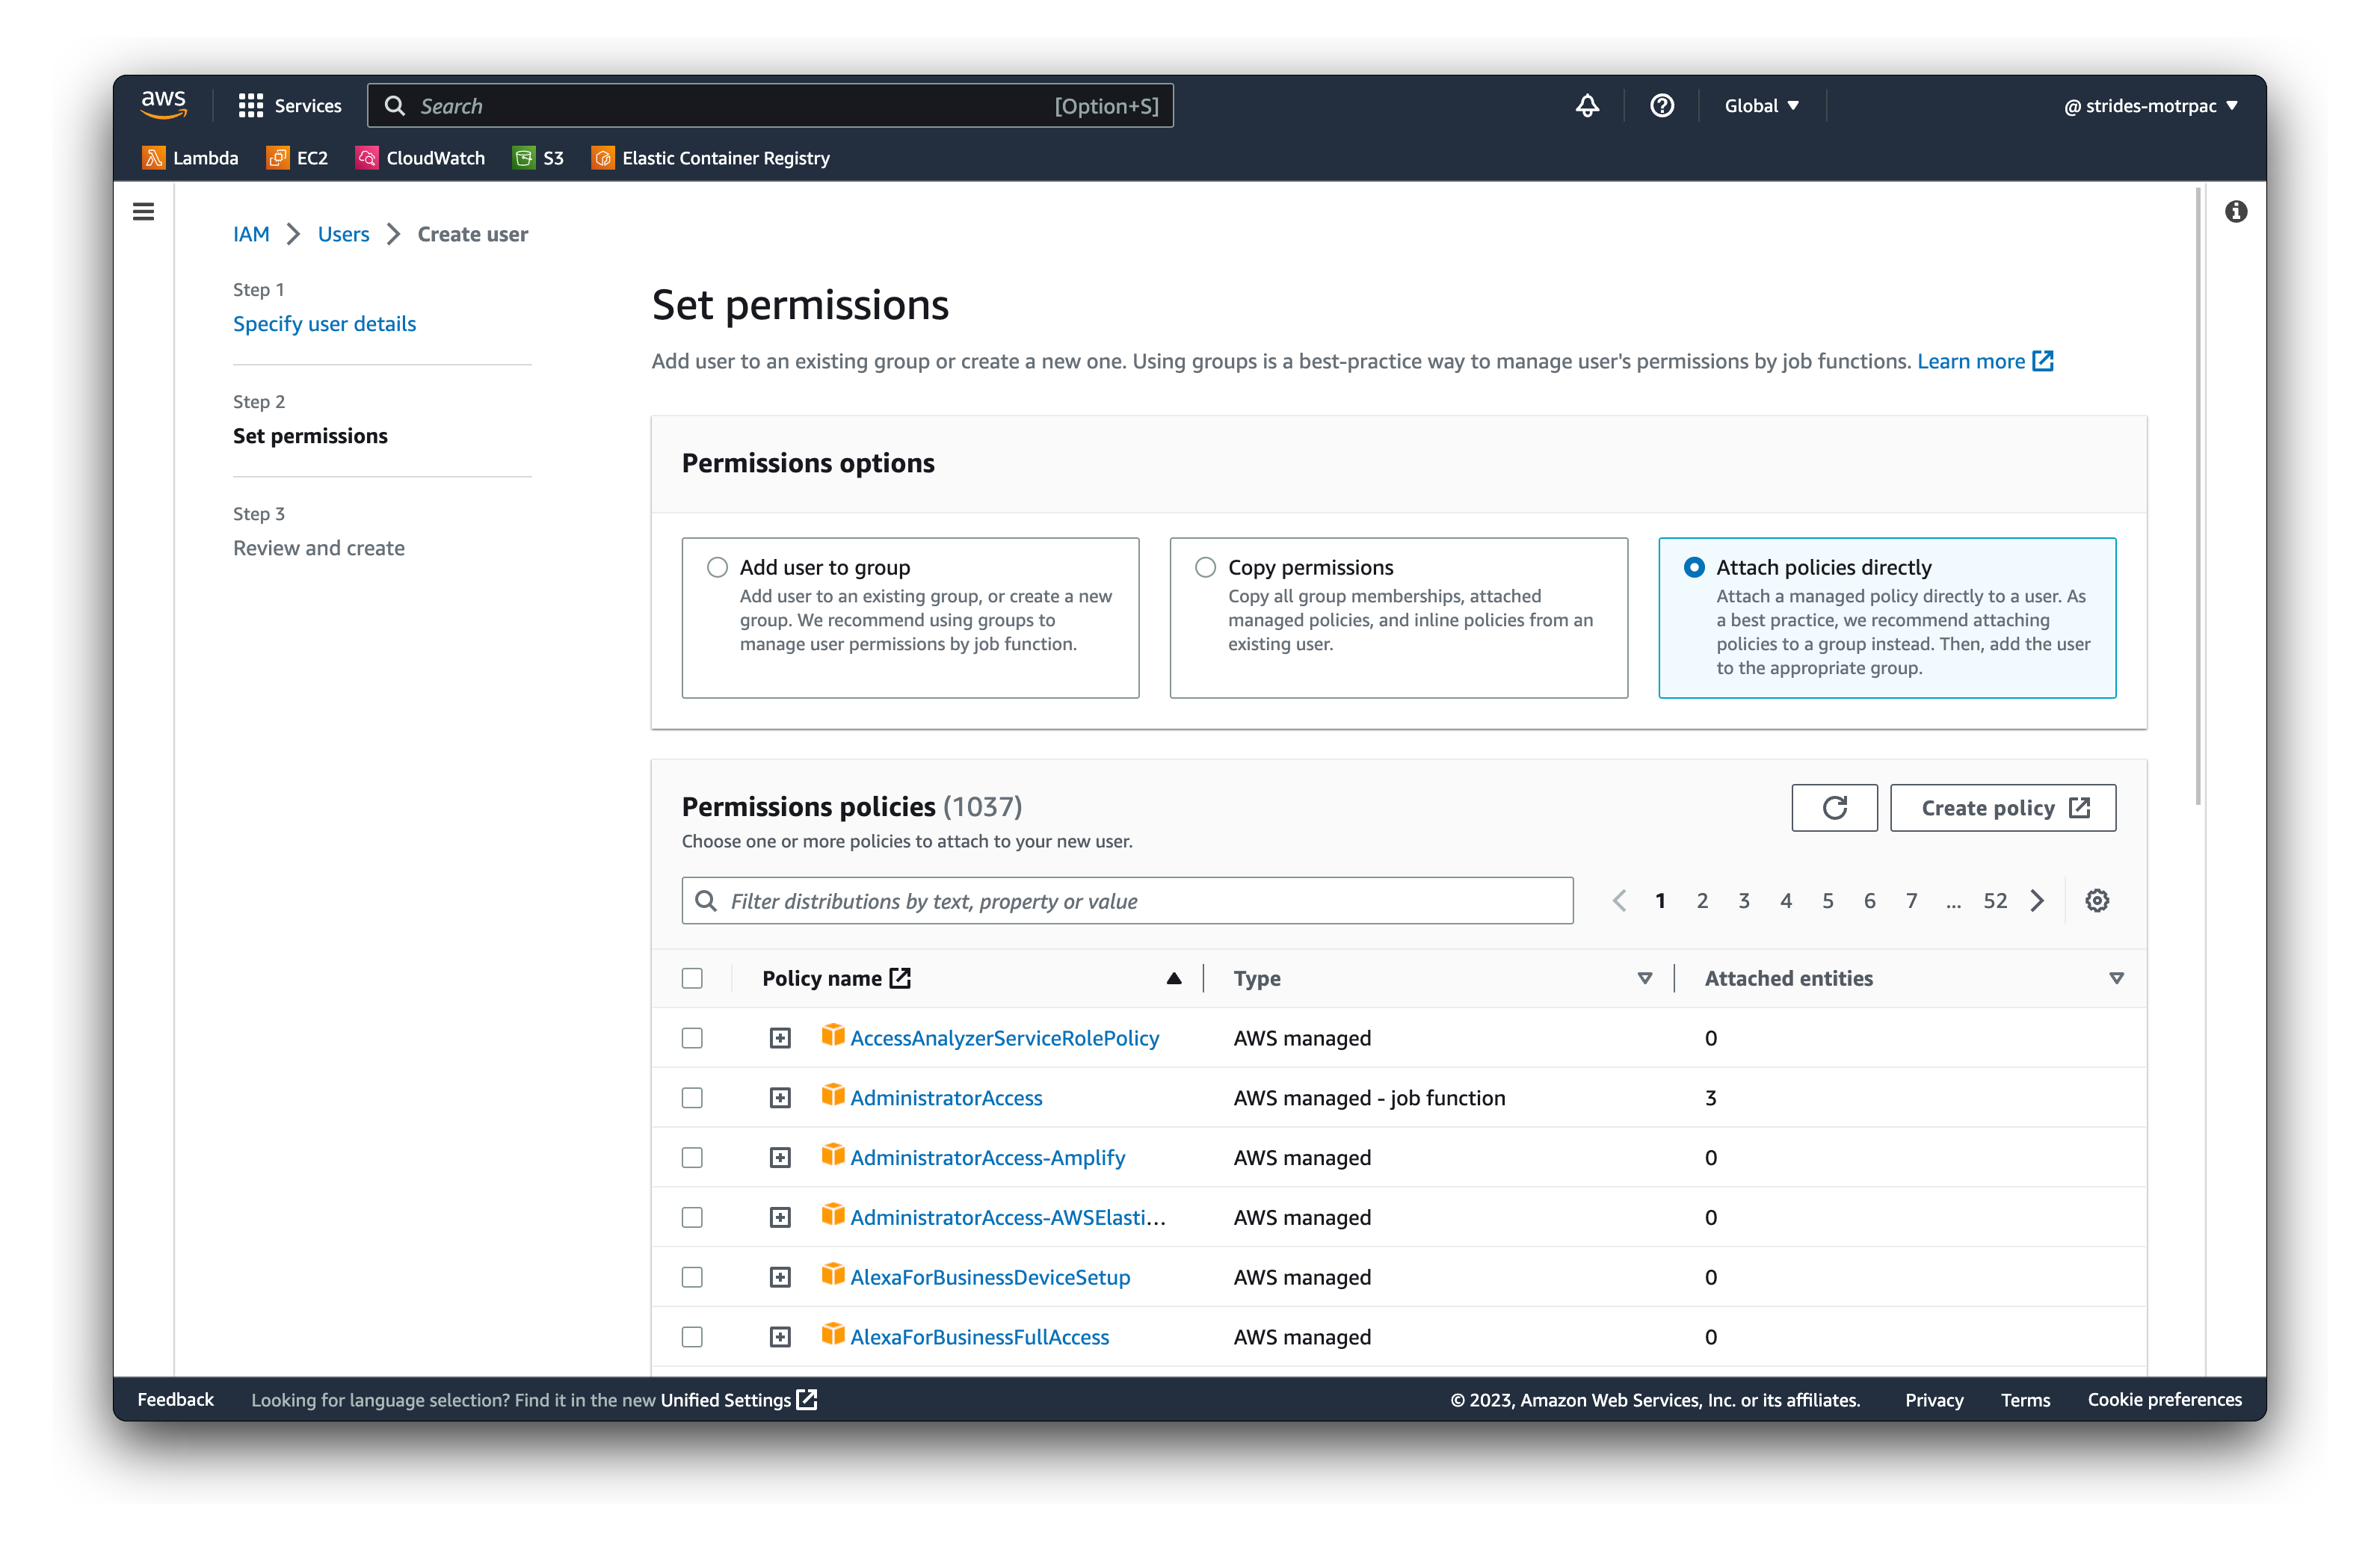
- Search for the following policies and select them:
- AWSCloudFormationFullAccess
- AmazonEC2FullAccess
- AmazonS3FullAccess
- IAMFullAccess
- AWSBatchFullAccess
- CloudWatchFullAccess
- AWSCodeCommitFullAccess
- AWSCodeBuildAdminAccess
- AWSCodePipeline_FullAccess
- AmazonSSMFullAccess
These policies are used by the application to create and manage all resources required to run your application. It is recommended that you restrict these permissions to only the resources required for your application.
View instructions for restricting permissions even further
Navigate to the Policies page in the AWS IAM console
Click on "Create policy"
Click on "JSON"
Paste the following JSON into the editor:
View Document
{ "Version": "2012-10-17", "Statement": [ { "Action": "ec2:", "Effect": "Allow", "Resource": "" }, { "Effect": "Allow", "Action": "elasticloadbalancing:", "Resource": "" }, { "Effect": "Allow", "Action": "cloudwatch:", "Resource": "" }, { "Effect": "Allow", "Action": "autoscaling:", "Resource": "" }, { "Effect": "Allow", "Action": [ "cloudformation:" ], "Resource": "" }, { "Effect": "Allow", "Action": [ "s3:", "s3-object-lambda:" ], "Resource": "" }, { "Effect": "Allow", "Action": [ "iam:" ], "Resource": "" }, { "Effect": "Allow", "Action": [ "batch:", "cloudwatch:GetMetricStatistics", "ec2:DescribeSubnets", "ec2:DescribeSecurityGroups", "ec2:DescribeKeyPairs", "ec2:DescribeVpcs", "ec2:DescribeImages", "ec2:DescribeLaunchTemplates", "ec2:DescribeLaunchTemplateVersions", "ecs:Describe*", "ecs:List*", "eks:DescribeCluster", "eks:ListClusters", "logs:Describe*", "logs:Get*", "logs:TestMetricFilter", "logs:FilterLogEvents", "iam:ListInstanceProfiles", "iam:ListRoles" ], "Resource": "" }, { "Effect": "Allow", "Action": [ "iam:PassRole" ], "Resource": [ "arn:aws:iam:::role/AWSBatchServiceRole", "arn:aws:iam:::role/service-role/AWSBatchServiceRole", "arn:aws:iam:::role/ecsInstanceRole", "arn:aws:iam:::instance-profile/ecsInstanceRole", "arn:aws:iam:::role/iaws-ec2-spot-fleet-role", "arn:aws:iam:::role/aws-ec2-spot-fleet-role", "arn:aws:iam:::role/AWSBatchJobRole*" ] }, { "Effect": "Allow", "Action": [ "autoscaling:Describe*", "cloudwatch:", "logs:", "sns:", "iam:GetPolicy", "iam:GetPolicyVersion", "iam:GetRole", "oam:ListSinks" ], "Resource": "" }, { "Effect": "Allow", "Action": [ "codecommit:" ], "Resource": "" }, { "Sid": "CloudWatchEventsCodeCommitRulesAccess", "Effect": "Allow", "Action": [ "events:DeleteRule", "events:DescribeRule", "events:DisableRule", "events:EnableRule", "events:PutRule", "events:PutTargets", "events:RemoveTargets", "events:ListTargetsByRule" ], "Resource": "arn:aws:events:::rule/codecommit*" }, { "Sid": "SNSTopicAndSubscriptionAccess", "Effect": "Allow", "Action": [ "sns:CreateTopic", "sns:DeleteTopic", "sns:Subscribe", "sns:Unsubscribe", "sns:SetTopicAttributes" ], "Resource": "arn:aws:sns:::codecommit*" }, { "Sid": "SNSTopicAndSubscriptionReadAccess", "Effect": "Allow", "Action": [ "sns:ListTopics", "sns:ListSubscriptionsByTopic", "sns:GetTopicAttributes" ], "Resource": "" }, { "Sid": "LambdaReadOnlyListAccess", "Effect": "Allow", "Action": [ "lambda:ListFunctions" ], "Resource": "" }, { "Sid": "IAMReadOnlyListAccess", "Effect": "Allow", "Action": [ "iam:ListUsers" ], "Resource": "" }, { "Sid": "IAMReadOnlyConsoleAccess", "Effect": "Allow", "Action": [ "iam:ListAccessKeys", "iam:ListSSHPublicKeys", "iam:ListServiceSpecificCredentials" ], "Resource": "arn:aws:iam:::user/${aws:username}" }, { "Sid": "IAMUserSSHKeys", "Effect": "Allow", "Action": [ "iam:DeleteSSHPublicKey", "iam:GetSSHPublicKey", "iam:ListSSHPublicKeys", "iam:UpdateSSHPublicKey", "iam:UploadSSHPublicKey" ], "Resource": "arn:aws:iam:::user/${aws:username}" }, { "Sid": "IAMSelfManageServiceSpecificCredentials", "Effect": "Allow", "Action": [ "iam:CreateServiceSpecificCredential", "iam:UpdateServiceSpecificCredential", "iam:DeleteServiceSpecificCredential", "iam:ResetServiceSpecificCredential" ], "Resource": "arn:aws:iam:::user/${aws:username}" }, { "Sid": "CodeStarNotificationsReadWriteAccess", "Effect": "Allow", "Action": [ "codestar-notifications:CreateNotificationRule", "codestar-notifications:DescribeNotificationRule", "codestar-notifications:UpdateNotificationRule", "codestar-notifications:DeleteNotificationRule", "codestar-notifications:Subscribe", "codestar-notifications:Unsubscribe" ], "Resource": "" }, { "Sid": "CodeStarNotificationsListAccess", "Effect": "Allow", "Action": [ "codestar-notifications:ListNotificationRules", "codestar-notifications:ListTargets", "codestar-notifications:ListTagsforResource", "codestar-notifications:ListEventTypes" ], "Resource": "" }, { "Sid": "CodeStarNotificationsSNSTopicCreateAccess", "Effect": "Allow", "Action": [ "sns:CreateTopic", "sns:SetTopicAttributes" ], "Resource": "arn:aws:sns:::codestar-notifications*" }, { "Sid": "AmazonCodeGuruReviewerFullAccess", "Effect": "Allow", "Action": [ "codeguru-reviewer:AssociateRepository", "codeguru-reviewer:DescribeRepositoryAssociation", "codeguru-reviewer:ListRepositoryAssociations", "codeguru-reviewer:DisassociateRepository", "codeguru-reviewer:DescribeCodeReview", "codeguru-reviewer:ListCodeReviews" ], "Resource": "" }, { "Sid": "CloudWatchEventsManagedRules", "Effect": "Allow", "Action": [ "events:PutRule", "events:PutTargets", "events:DeleteRule", "events:RemoveTargets" ], "Resource": "", "Condition": { "StringEquals": { "events:ManagedBy": "codeguru-reviewer.amazonaws.com" } } }, { "Sid": "CodeStarNotificationsChatbotAccess", "Effect": "Allow", "Action": [ "chatbot:DescribeSlackChannelConfigurations" ], "Resource": "" }, { "Sid": "CodeStarConnectionsReadOnlyAccess", "Effect": "Allow", "Action": [ "codestar-connections:ListConnections", "codestar-connections:GetConnection" ], "Resource": "arn:aws:codestar-connections:::connection/" }, { "Action": [ "codebuild:", "codecommit:GetBranch", "codecommit:GetCommit", "codecommit:GetRepository", "codecommit:ListBranches", "codecommit:ListRepositories", "cloudwatch:GetMetricStatistics", "ec2:DescribeVpcs", "ec2:DescribeSecurityGroups", "ec2:DescribeSubnets", "ecr:DescribeRepositories", "ecr:ListImages", "elasticfilesystem:DescribeFileSystems", "events:DeleteRule", "events:DescribeRule", "events:DisableRule", "events:EnableRule", "events:ListTargetsByRule", "events:ListRuleNamesByTarget", "events:PutRule", "events:PutTargets", "events:RemoveTargets", "logs:GetLogEvents", "s3:GetBucketLocation", "s3:ListAllMyBuckets" ], "Effect": "Allow", "Resource": "" }, { "Action": [ "logs:DeleteLogGroup" ], "Effect": "Allow", "Resource": "arn:aws:logs:::log-group:/aws/codebuild/:log-stream:" }, { "Effect": "Allow", "Action": [ "ssm:PutParameter" ], "Resource": "arn:aws:ssm:::parameter/CodeBuild/" }, { "Effect": "Allow", "Action": [ "ssm:StartSession" ], "Resource": "arn:aws:ecs:::task//" }, { "Sid": "CodeStarConnectionsReadWriteAccess", "Effect": "Allow", "Action": [ "codestar-connections:CreateConnection", "codestar-connections:DeleteConnection", "codestar-connections:UpdateConnectionInstallation", "codestar-connections:TagResource", "codestar-connections:UntagResource", "codestar-connections:ListConnections", "codestar-connections:ListInstallationTargets", "codestar-connections:ListTagsForResource", "codestar-connections:GetConnection", "codestar-connections:GetIndividualAccessToken", "codestar-connections:GetInstallationUrl", "codestar-connections:PassConnection", "codestar-connections:StartOAuthHandshake", "codestar-connections:UseConnection" ], "Resource": "arn:aws:codestar-connections:::connection/" }, { "Sid": "SNSTopicListAccess", "Effect": "Allow", "Action": [ "sns:ListTopics", "sns:GetTopicAttributes" ], "Resource": "" }, { "Action": [ "codepipeline:", "cloudformation:DescribeStacks", "cloudformation:ListChangeSets", "cloudtrail:DescribeTrails", "codebuild:BatchGetProjects", "codebuild:CreateProject", "codebuild:ListCuratedEnvironmentImages", "codebuild:ListProjects", "codecommit:ListBranches", "codecommit:GetReferences", "codecommit:ListRepositories", "codedeploy:BatchGetDeploymentGroups", "codedeploy:ListApplications", "codedeploy:ListDeploymentGroups", "ec2:DescribeSecurityGroups", "ec2:DescribeSubnets", "ec2:DescribeVpcs", "ecr:DescribeRepositories", "ecr:ListImages", "ecs:ListClusters", "ecs:ListServices", "elasticbeanstalk:DescribeApplications", "elasticbeanstalk:DescribeEnvironments", "iam:ListRoles", "iam:GetRole", "lambda:ListFunctions", "events:ListRules", "events:ListTargetsByRule", "events:DescribeRule", "opsworks:DescribeApps", "opsworks:DescribeLayers", "opsworks:DescribeStacks", "s3:ListAllMyBuckets", "sns:ListTopics", "codestar-notifications:ListNotificationRules", "codestar-notifications:ListTargets", "codestar-notifications:ListTagsforResource", "codestar-notifications:ListEventTypes", "states:ListStateMachines" ], "Effect": "Allow", "Resource": "" }, { "Action": [ "s3:GetObject", "s3:ListBucket", "s3:GetBucketPolicy", "s3:GetBucketVersioning", "s3:GetObjectVersion", "s3:CreateBucket", "s3:PutBucketPolicy" ], "Effect": "Allow", "Resource": "arn:aws:s3:::codepipeline-" }, { "Action": [ "cloudtrail:PutEventSelectors", "cloudtrail:CreateTrail", "cloudtrail:GetEventSelectors", "cloudtrail:StartLogging" ], "Effect": "Allow", "Resource": "arn:aws:cloudtrail:::trail/codepipeline-source-trail" }, { "Action": [ "iam:PassRole" ], "Effect": "Allow", "Resource": [ "arn:aws:iam:::role/service-role/cwe-role-" ], "Condition": { "StringEquals": { "iam:PassedToService": [ "events.amazonaws.com" ] } } }, { "Action": [ "iam:PassRole" ], "Effect": "Allow", "Resource": "", "Condition": { "StringEquals": { "iam:PassedToService": [ "codepipeline.amazonaws.com" ] } } }, { "Action": [ "events:PutRule", "events:PutTargets", "events:DeleteRule", "events:DisableRule", "events:RemoveTargets" ], "Effect": "Allow", "Resource": [ "arn:aws:events:::rule/codepipeline-" ] }, { "Effect": "Allow", "Action": [ "ds:CreateComputer", "ds:DescribeDirectories", "logs:", "ssm:", "ec2messages:" ], "Resource": "*" } ] }
Switch to the Visual Editor tab and review all granted permissions
Review the policy and click Create policy.
- Click on Next
- Click on Create user
- Click on the user you just created
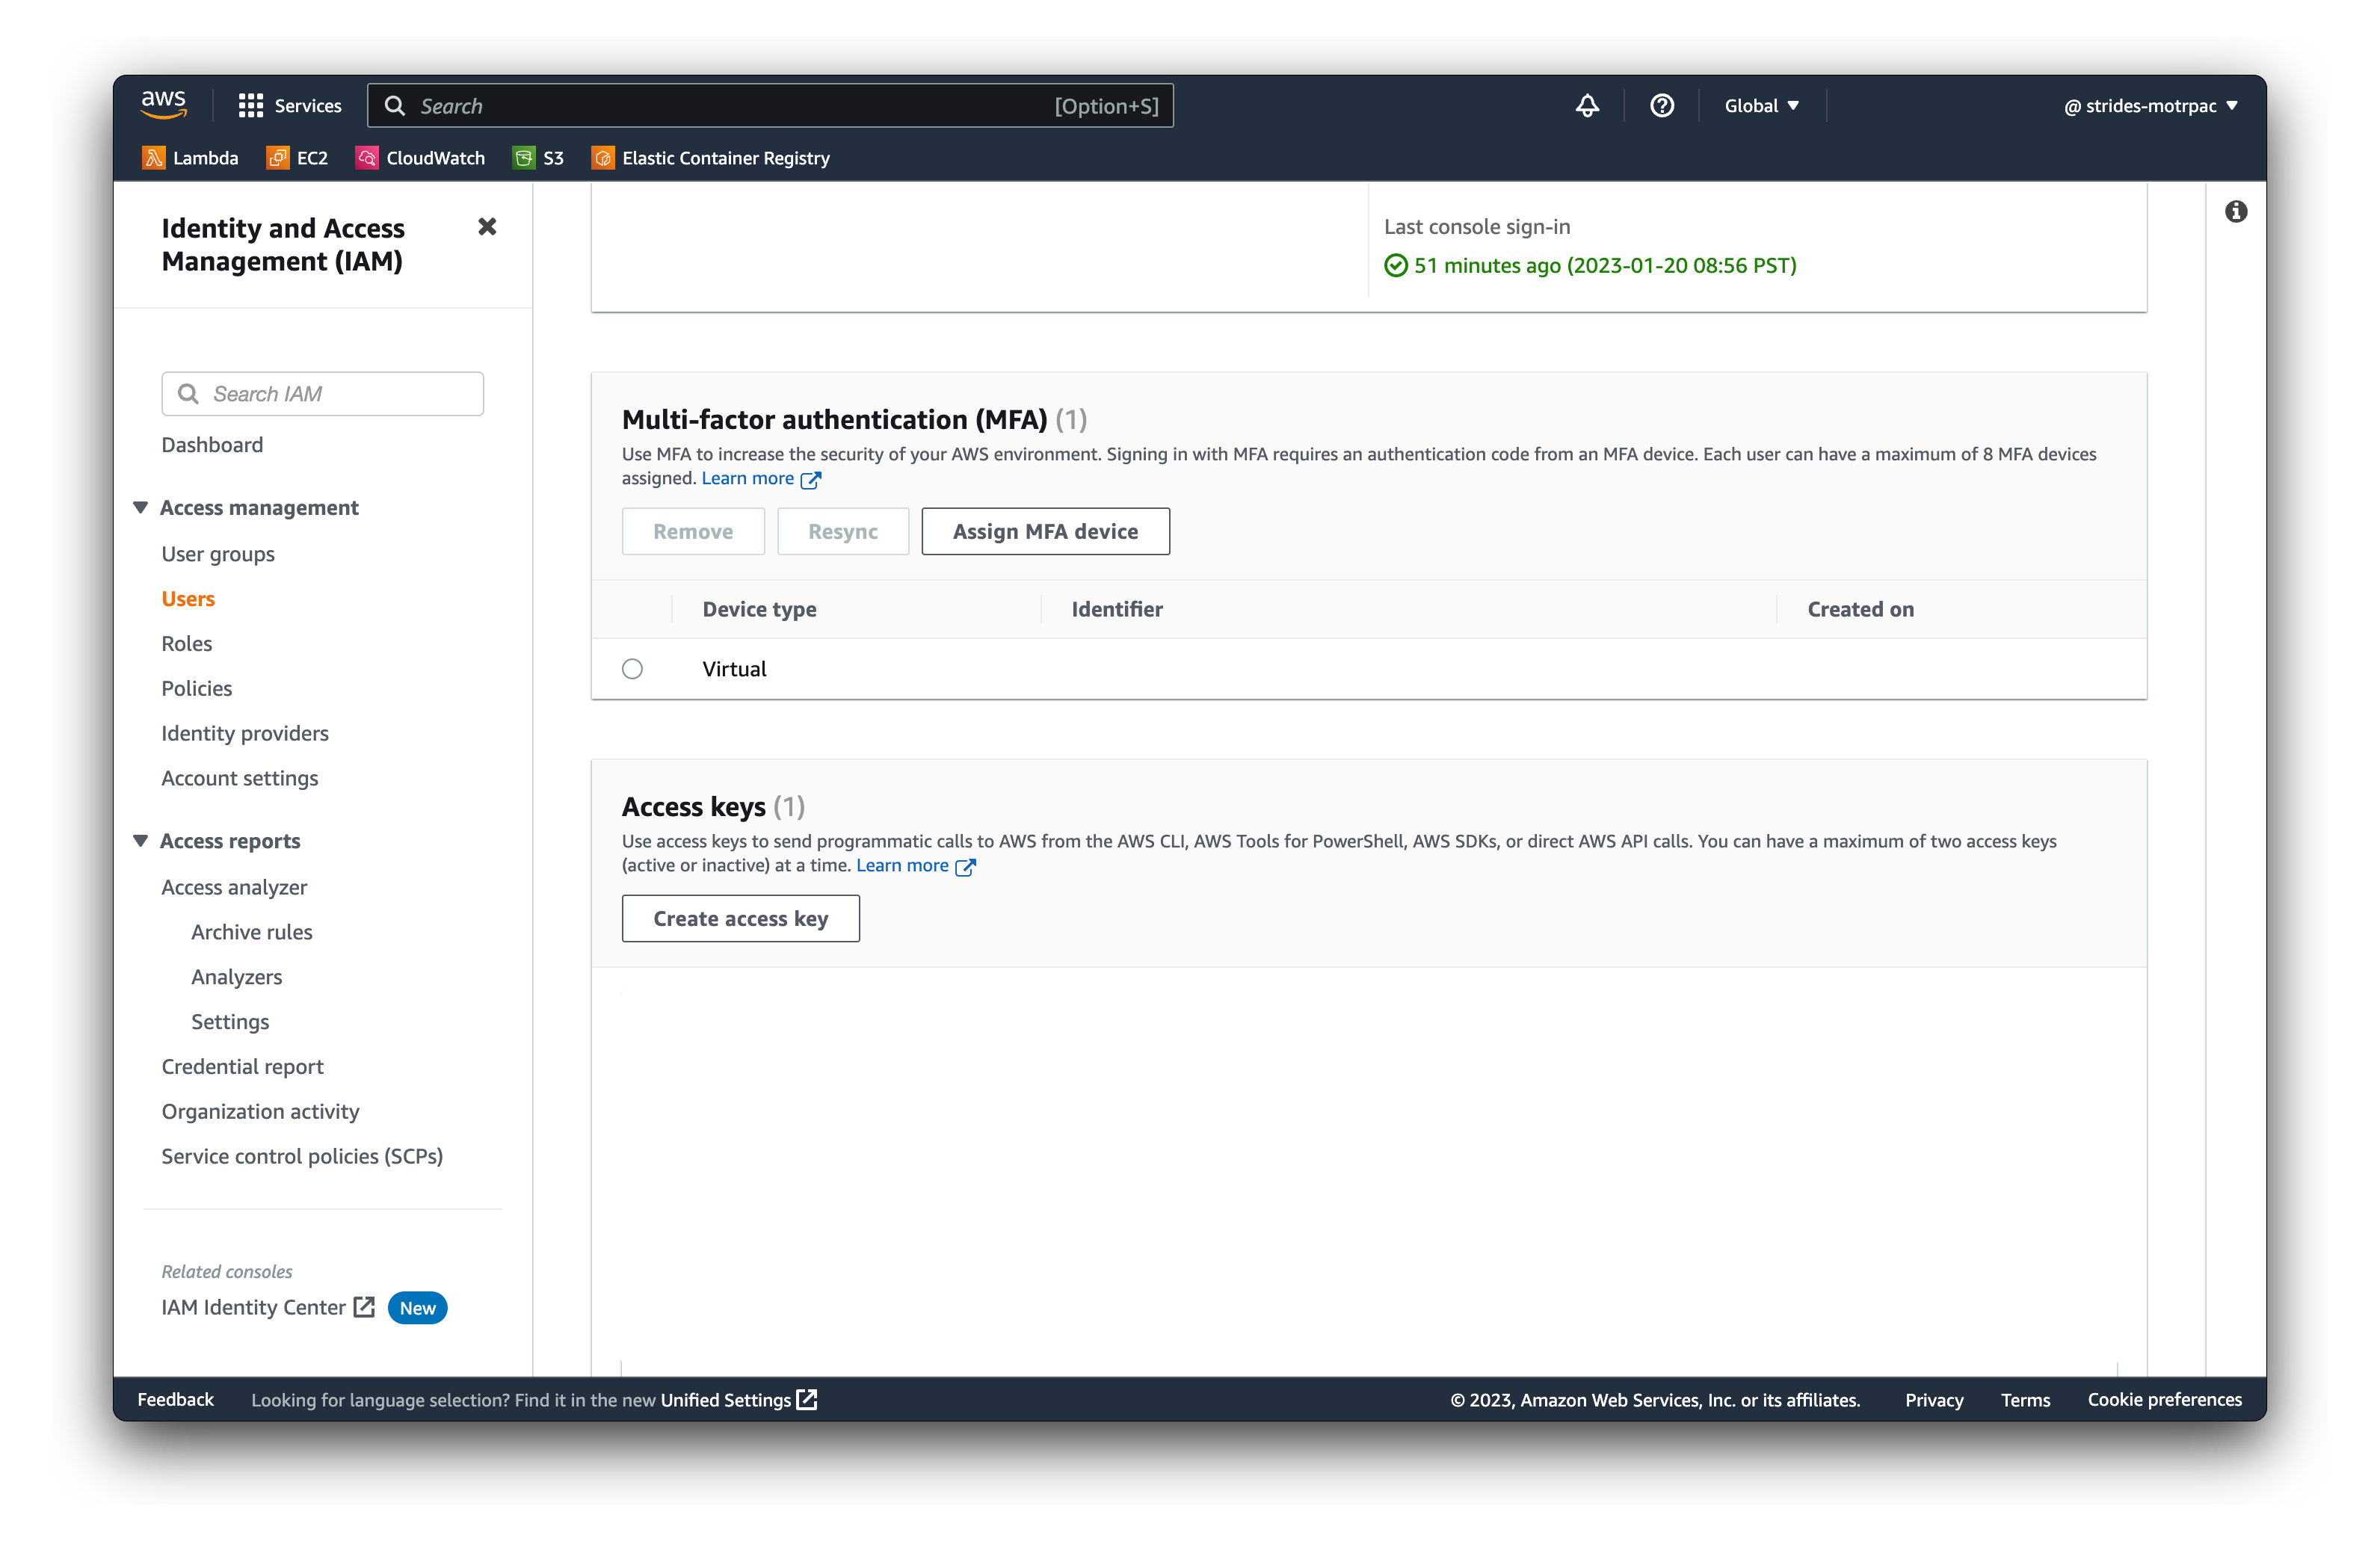
- Click on Security credentials tab
- Click on Create access key
- Click on Download .csv
- Save the file to a secure location
You will not be able to access the secret access key again. If you lose it, you will have to create a new access key. Do not share your access key with anyone and keep it safe.
- Click on Close
Enable required APIs
The following instructions are for enabling the required APIs on your Google Cloud project. If you already have the required APIs enabled/have a service account, you can skip this section.
Go to APIs & Services on your project and enable the following APIs on your Google Cloud console:
- Compute Engine API
- Cloud Storage API: DO NOT click on "Create credentials"
- Genomics API
- Cloud Storage JSON API
- Google Cloud Life Sciences API
Create a new service account
The following instructions are for creating a service account with the required roles. If you already have a service account with the required roles, you can skip this section.
Go to Service accounts on your project and create a new service account with the following roles:
- Compute Engine Instance Admin
- Storage Admin
- Service Account User
- Genomics Admin
- Cloud Life Sciences Admin
This service account will be used both to authenticate with Google Cloud Platform via the desktop application, and also as the identity of the virtual machines which OmicsPipelines will create to run and manage your workflows.
Step-by-step instructions
The following instructions fairly broad permissions for this service account, which tend to be discouraged in cloud development. As far as we can tell, these are the minimum required permissions for the service account, and unfortunately, the Broad Institute (the creator of the technology OmicsPipelines is build on) still has not responded to this GitHub issue about minimum required permissions for the service account to have.
- Log in to the Google Cloud Platform console
- Navigate to the service accounts page in the Google Cloud Identity and Access Management (IAM) console
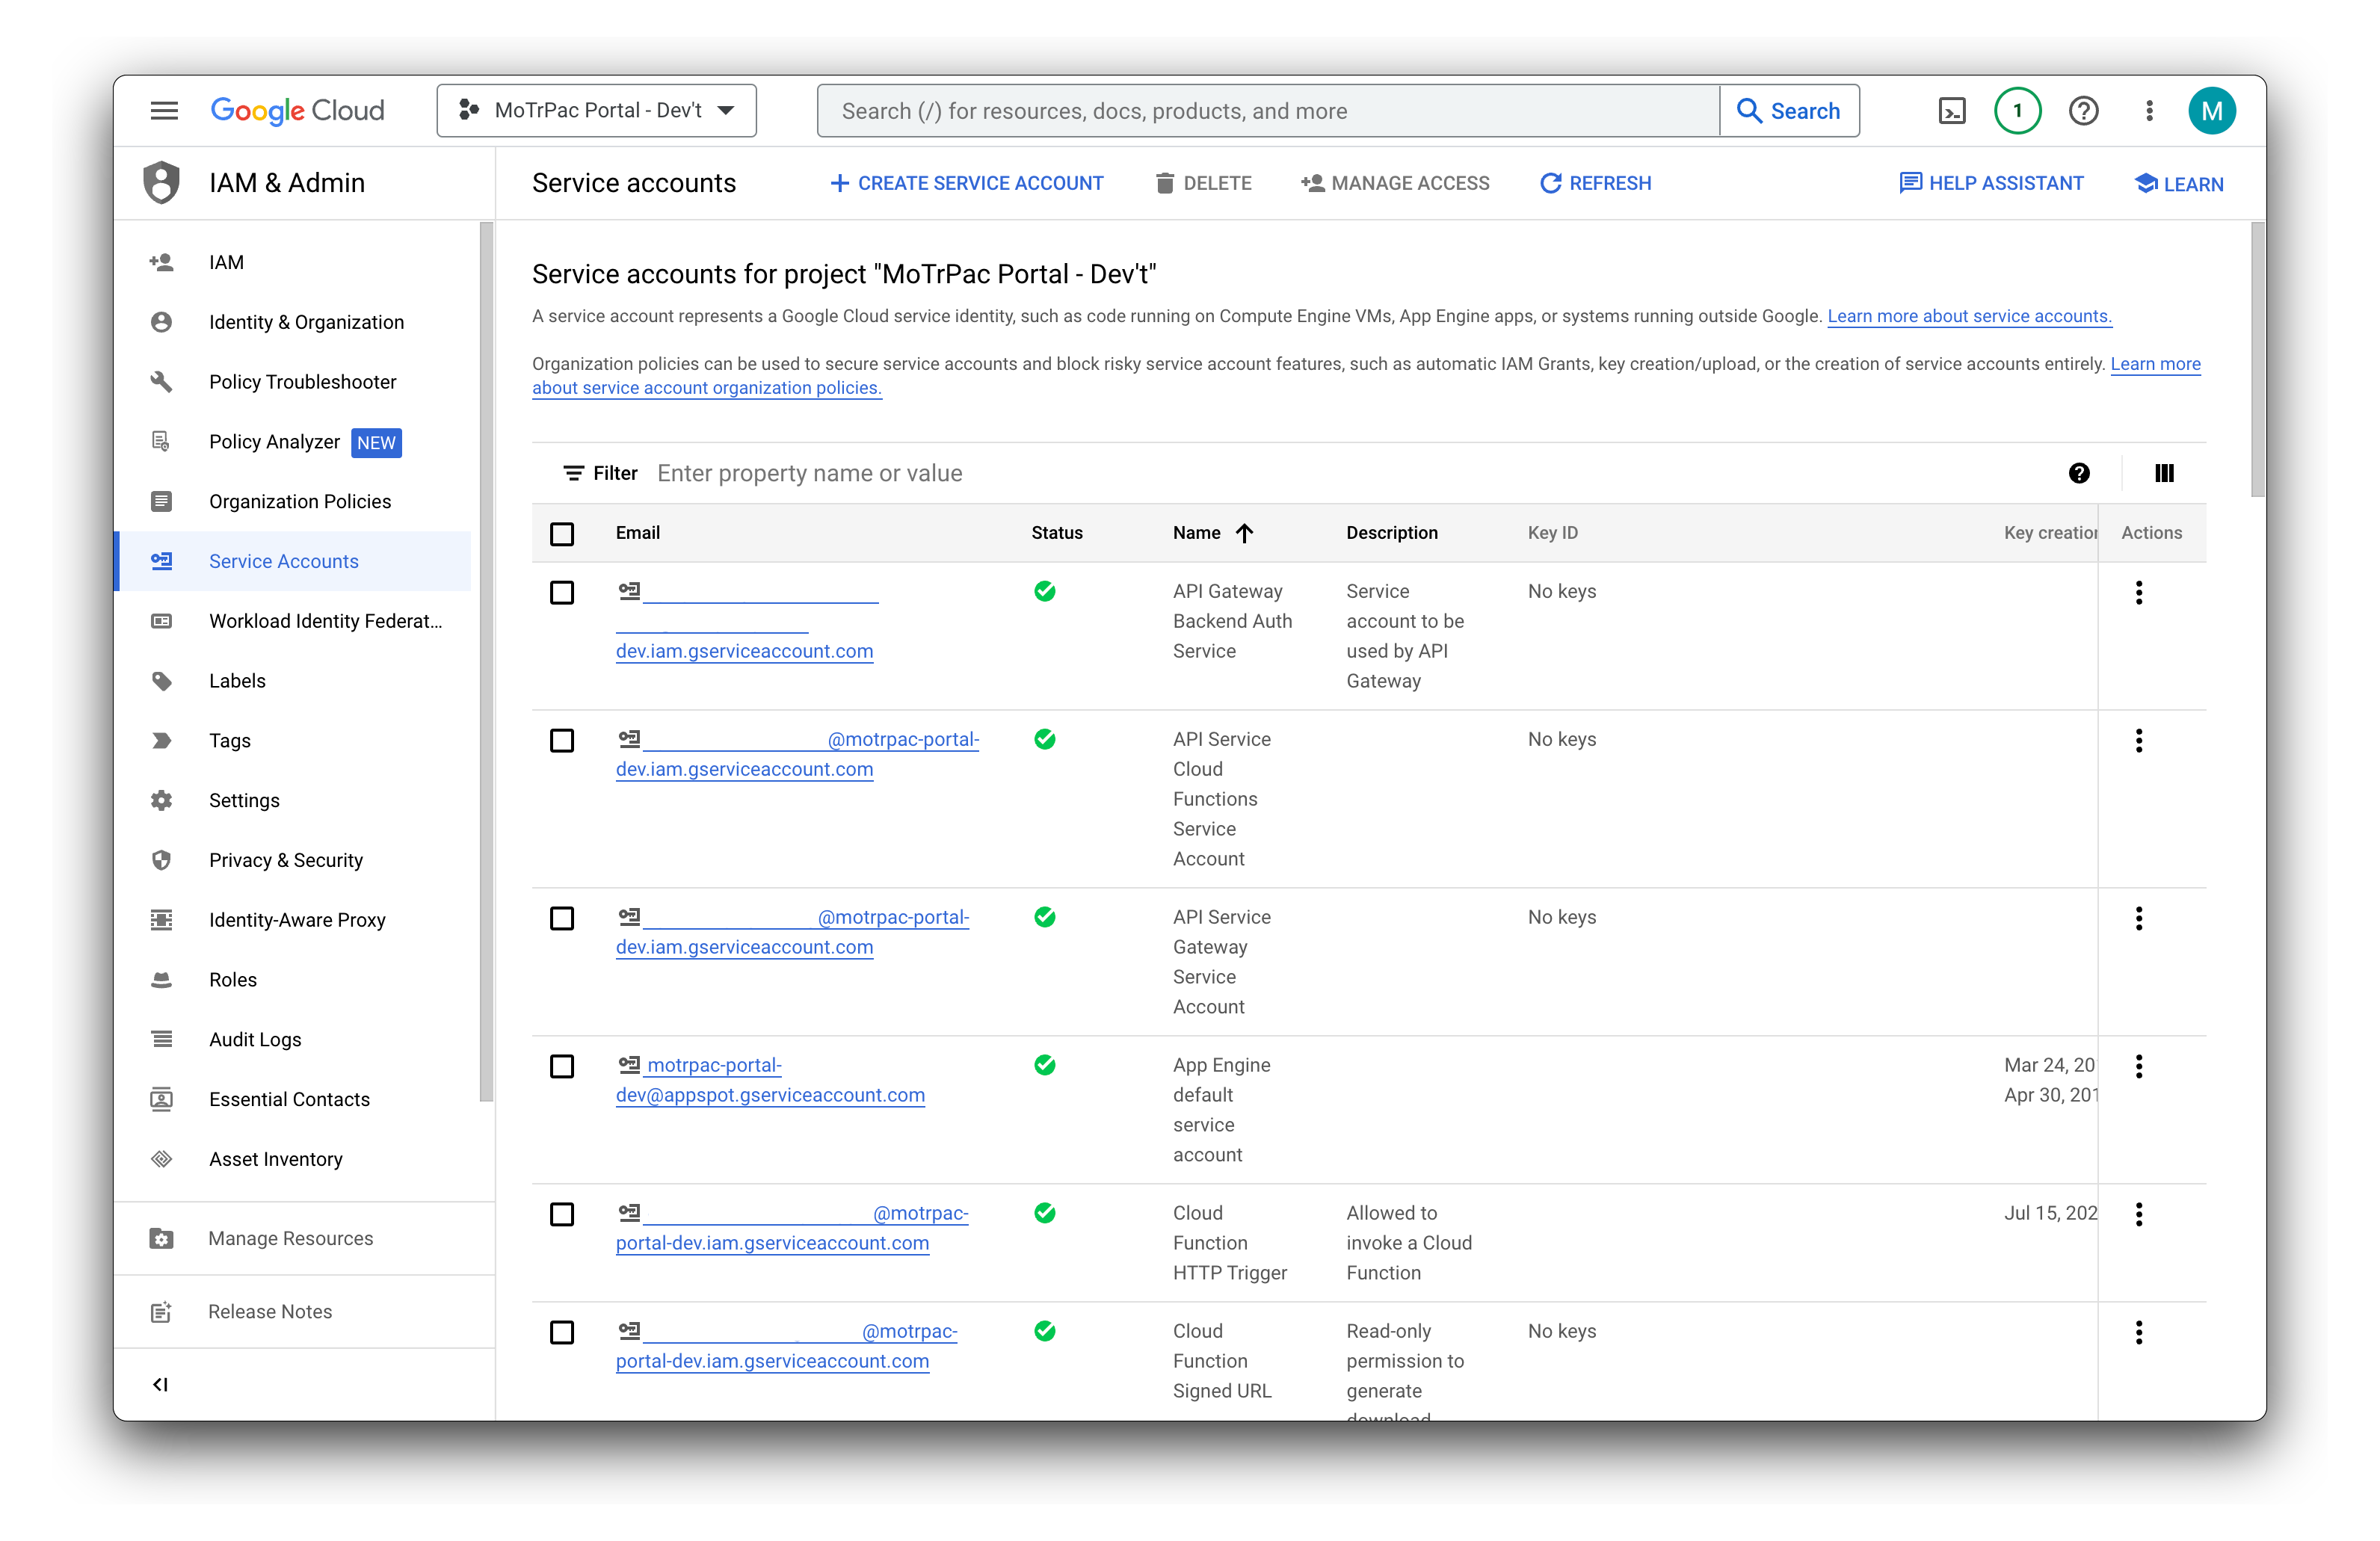
Service accounts act as the "identity" of the workload in the cloud, and are able to be equipped with specific "permissions" to accomplish special tasks, like creating and destroying virtual machines.
- Click on Create service account
- Enter a name and description and click on Create and continue
- Search for and select the following roles:
- Compute Engine Instance Admin
- Storage Admin
- Service Account User
- Genomics Admin
- Cloud Life Sciences Admin
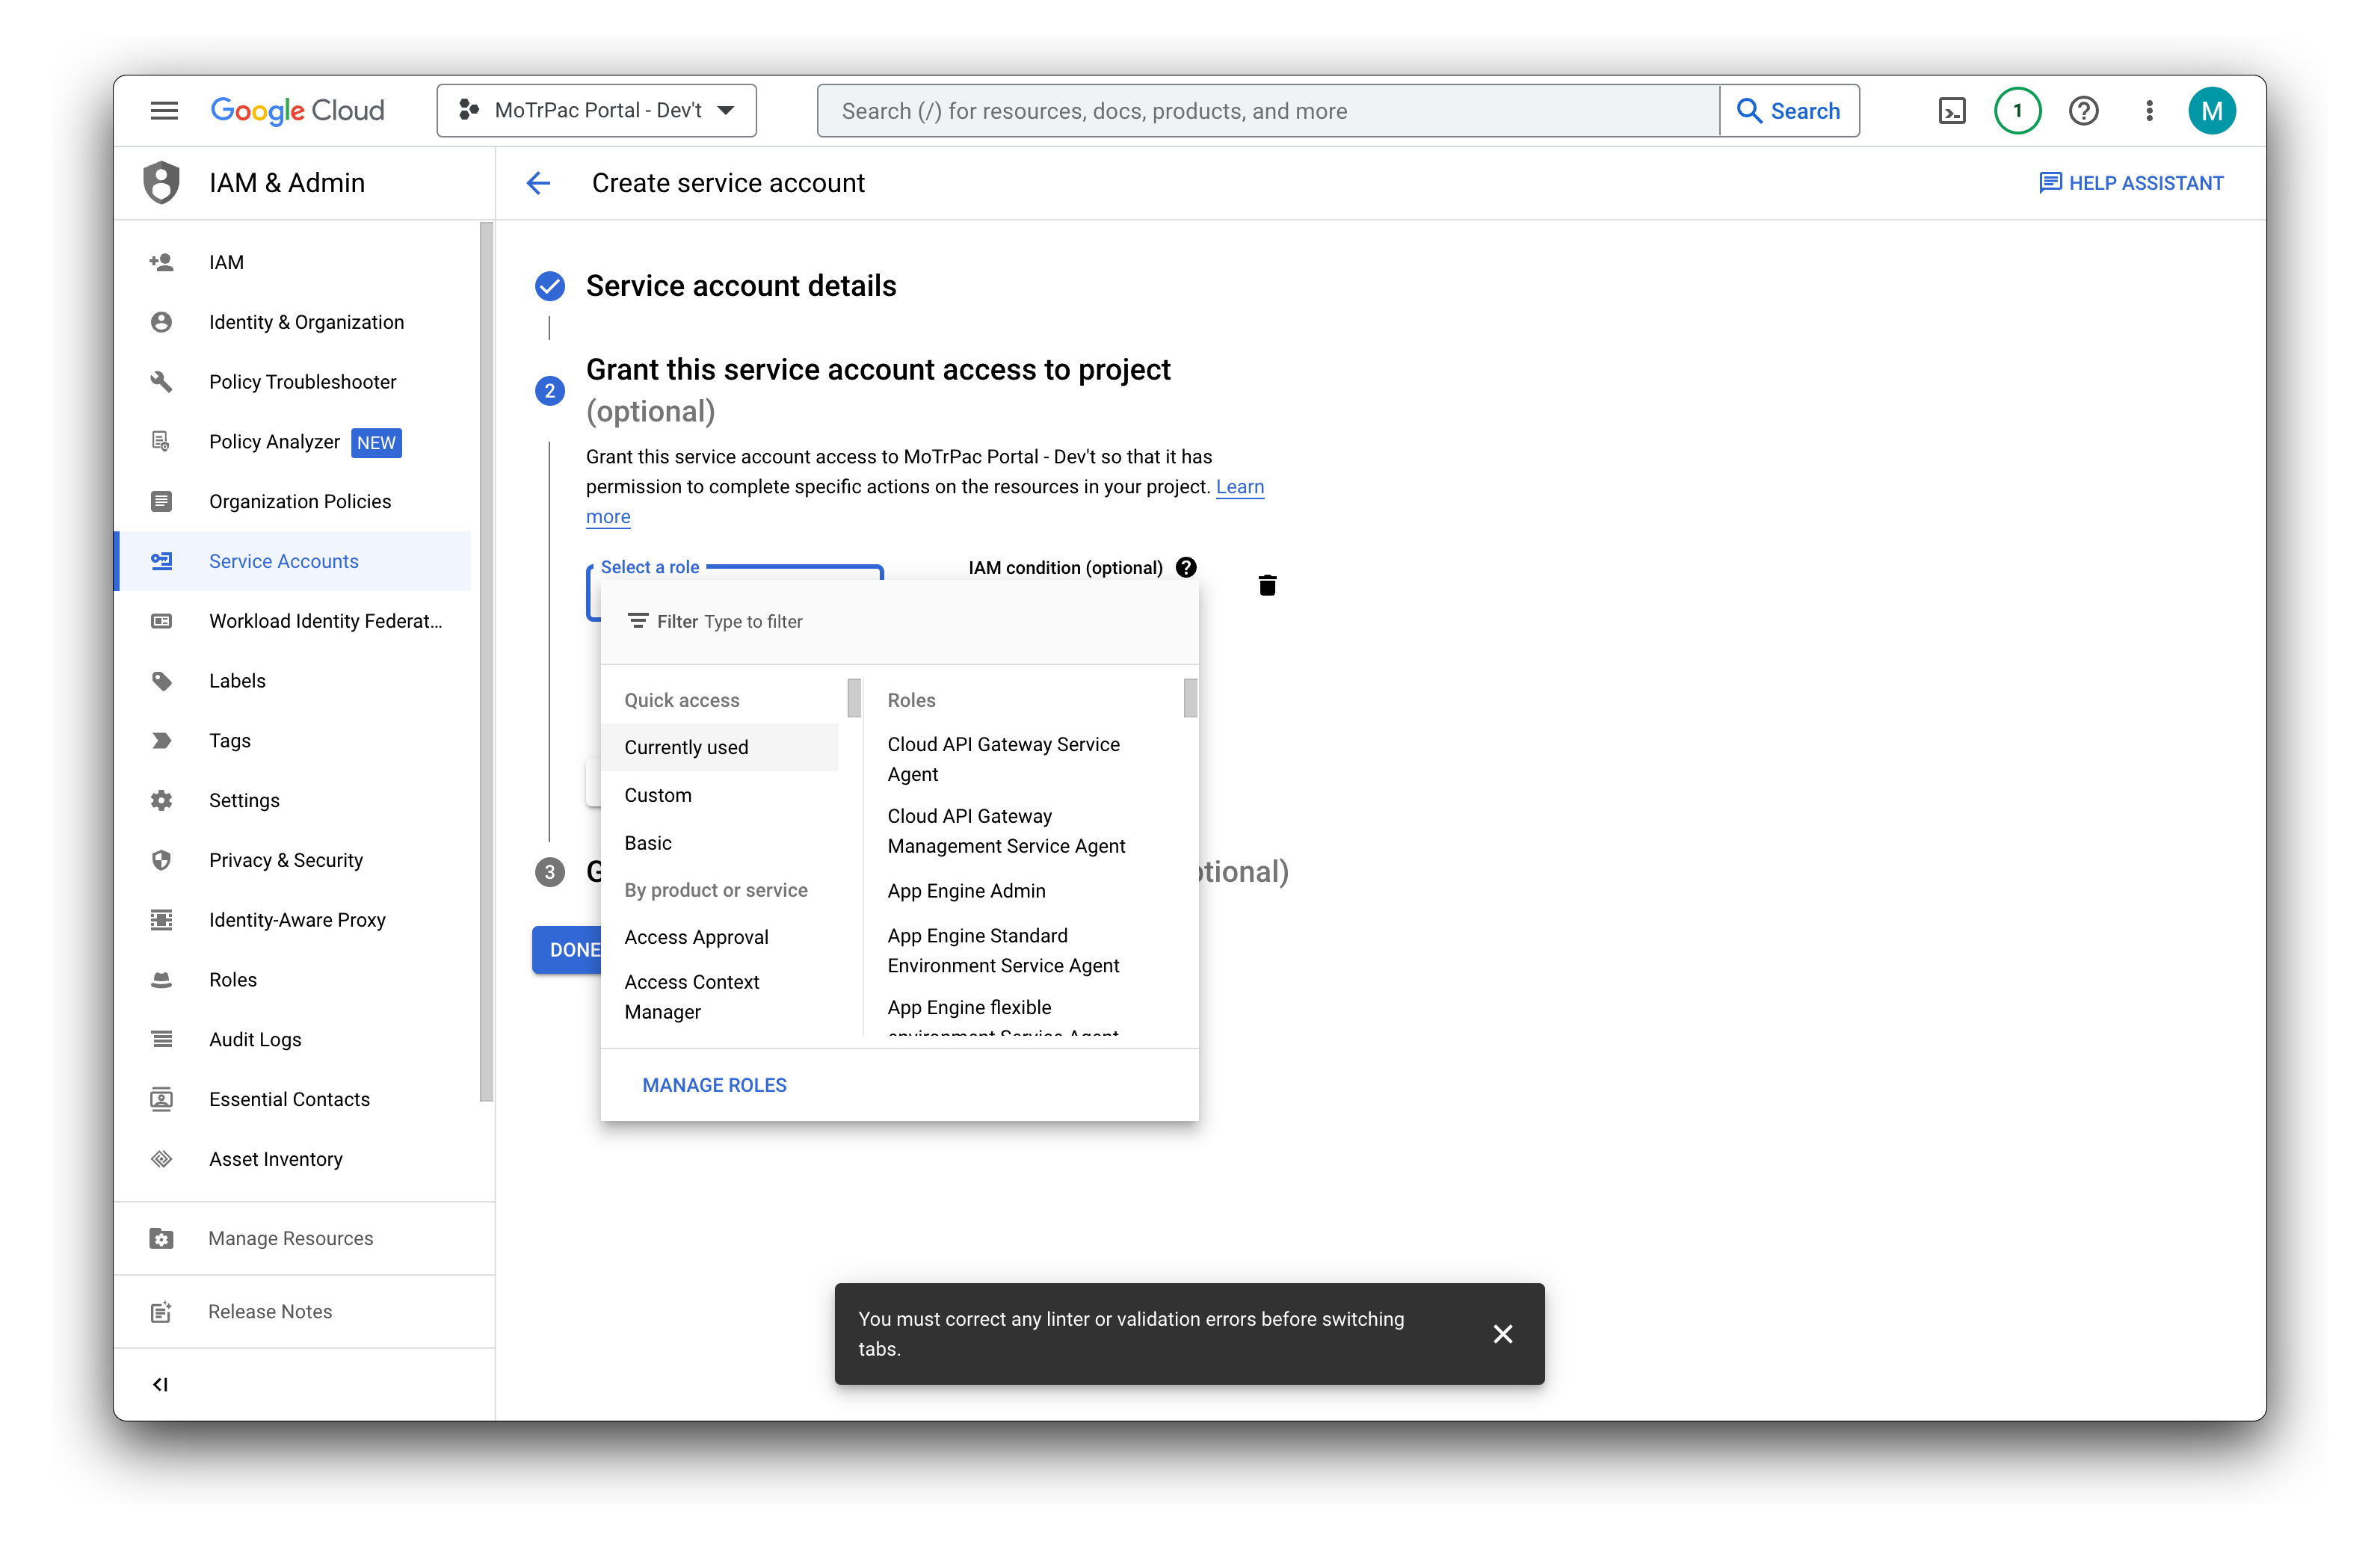
- Click on Continue
- Optionally grant other users access to this service account. Enter the emails of users who will be able to use this service account.
User email addresses must be registered with Google Cloud Platform in order for them to have access to this service account.
- Click on Done
Create service account JSON keys
- Log in to the Google Cloud Platform console
- Navigate to the service accounts page in the Google Cloud Identity and Access Management (IAM) console

- Select the service account which you want to create a key for from the list of displayed service accounts

- Click on Keys
- Click on Add key
- Select JSON and click on Create
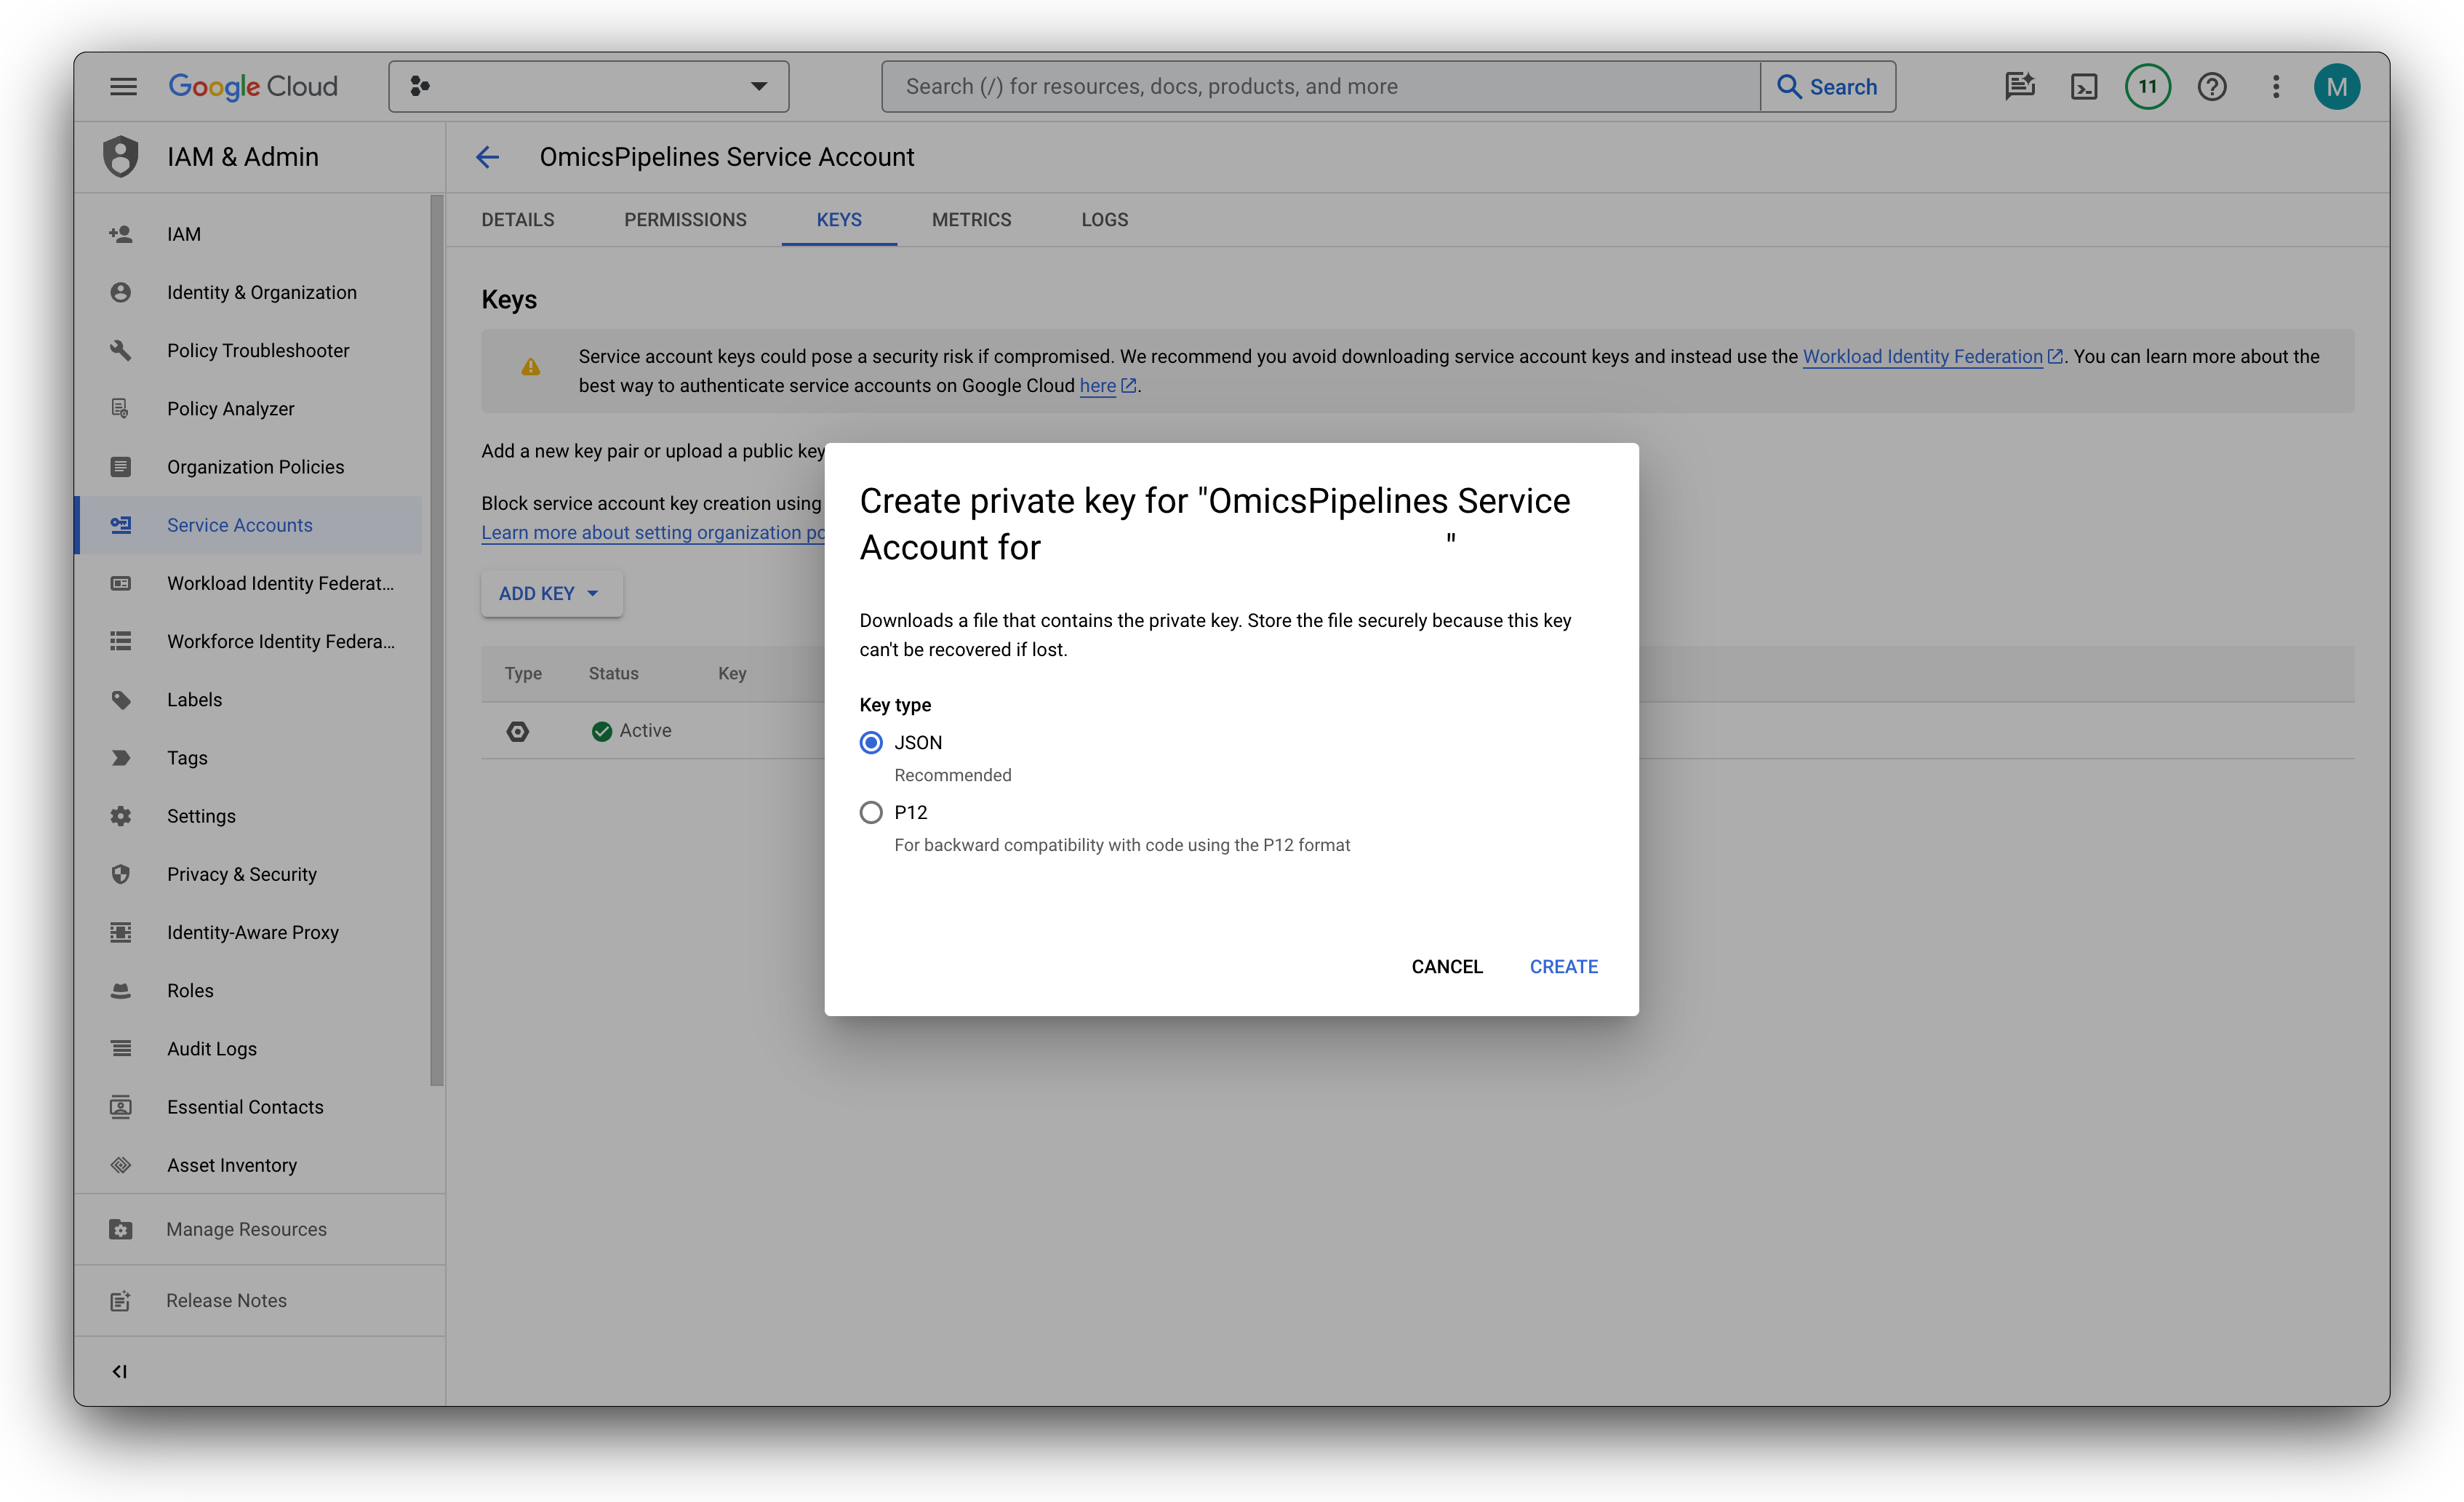
- Save the file to a secure location
You will not be able to access the secret access key again. If you lose it, you will have to create a new access key. This file is a password. Do not share your access key with anyone and keep it safe.
Configure the application
- Open the application and click on your chosen cloud provider
- Amazon Web Services
- Google Cloud Platform
- Open up the '.csv' file that you just downloaded and look for the 'Access Key ID' and 'Secret Access Key' fields.
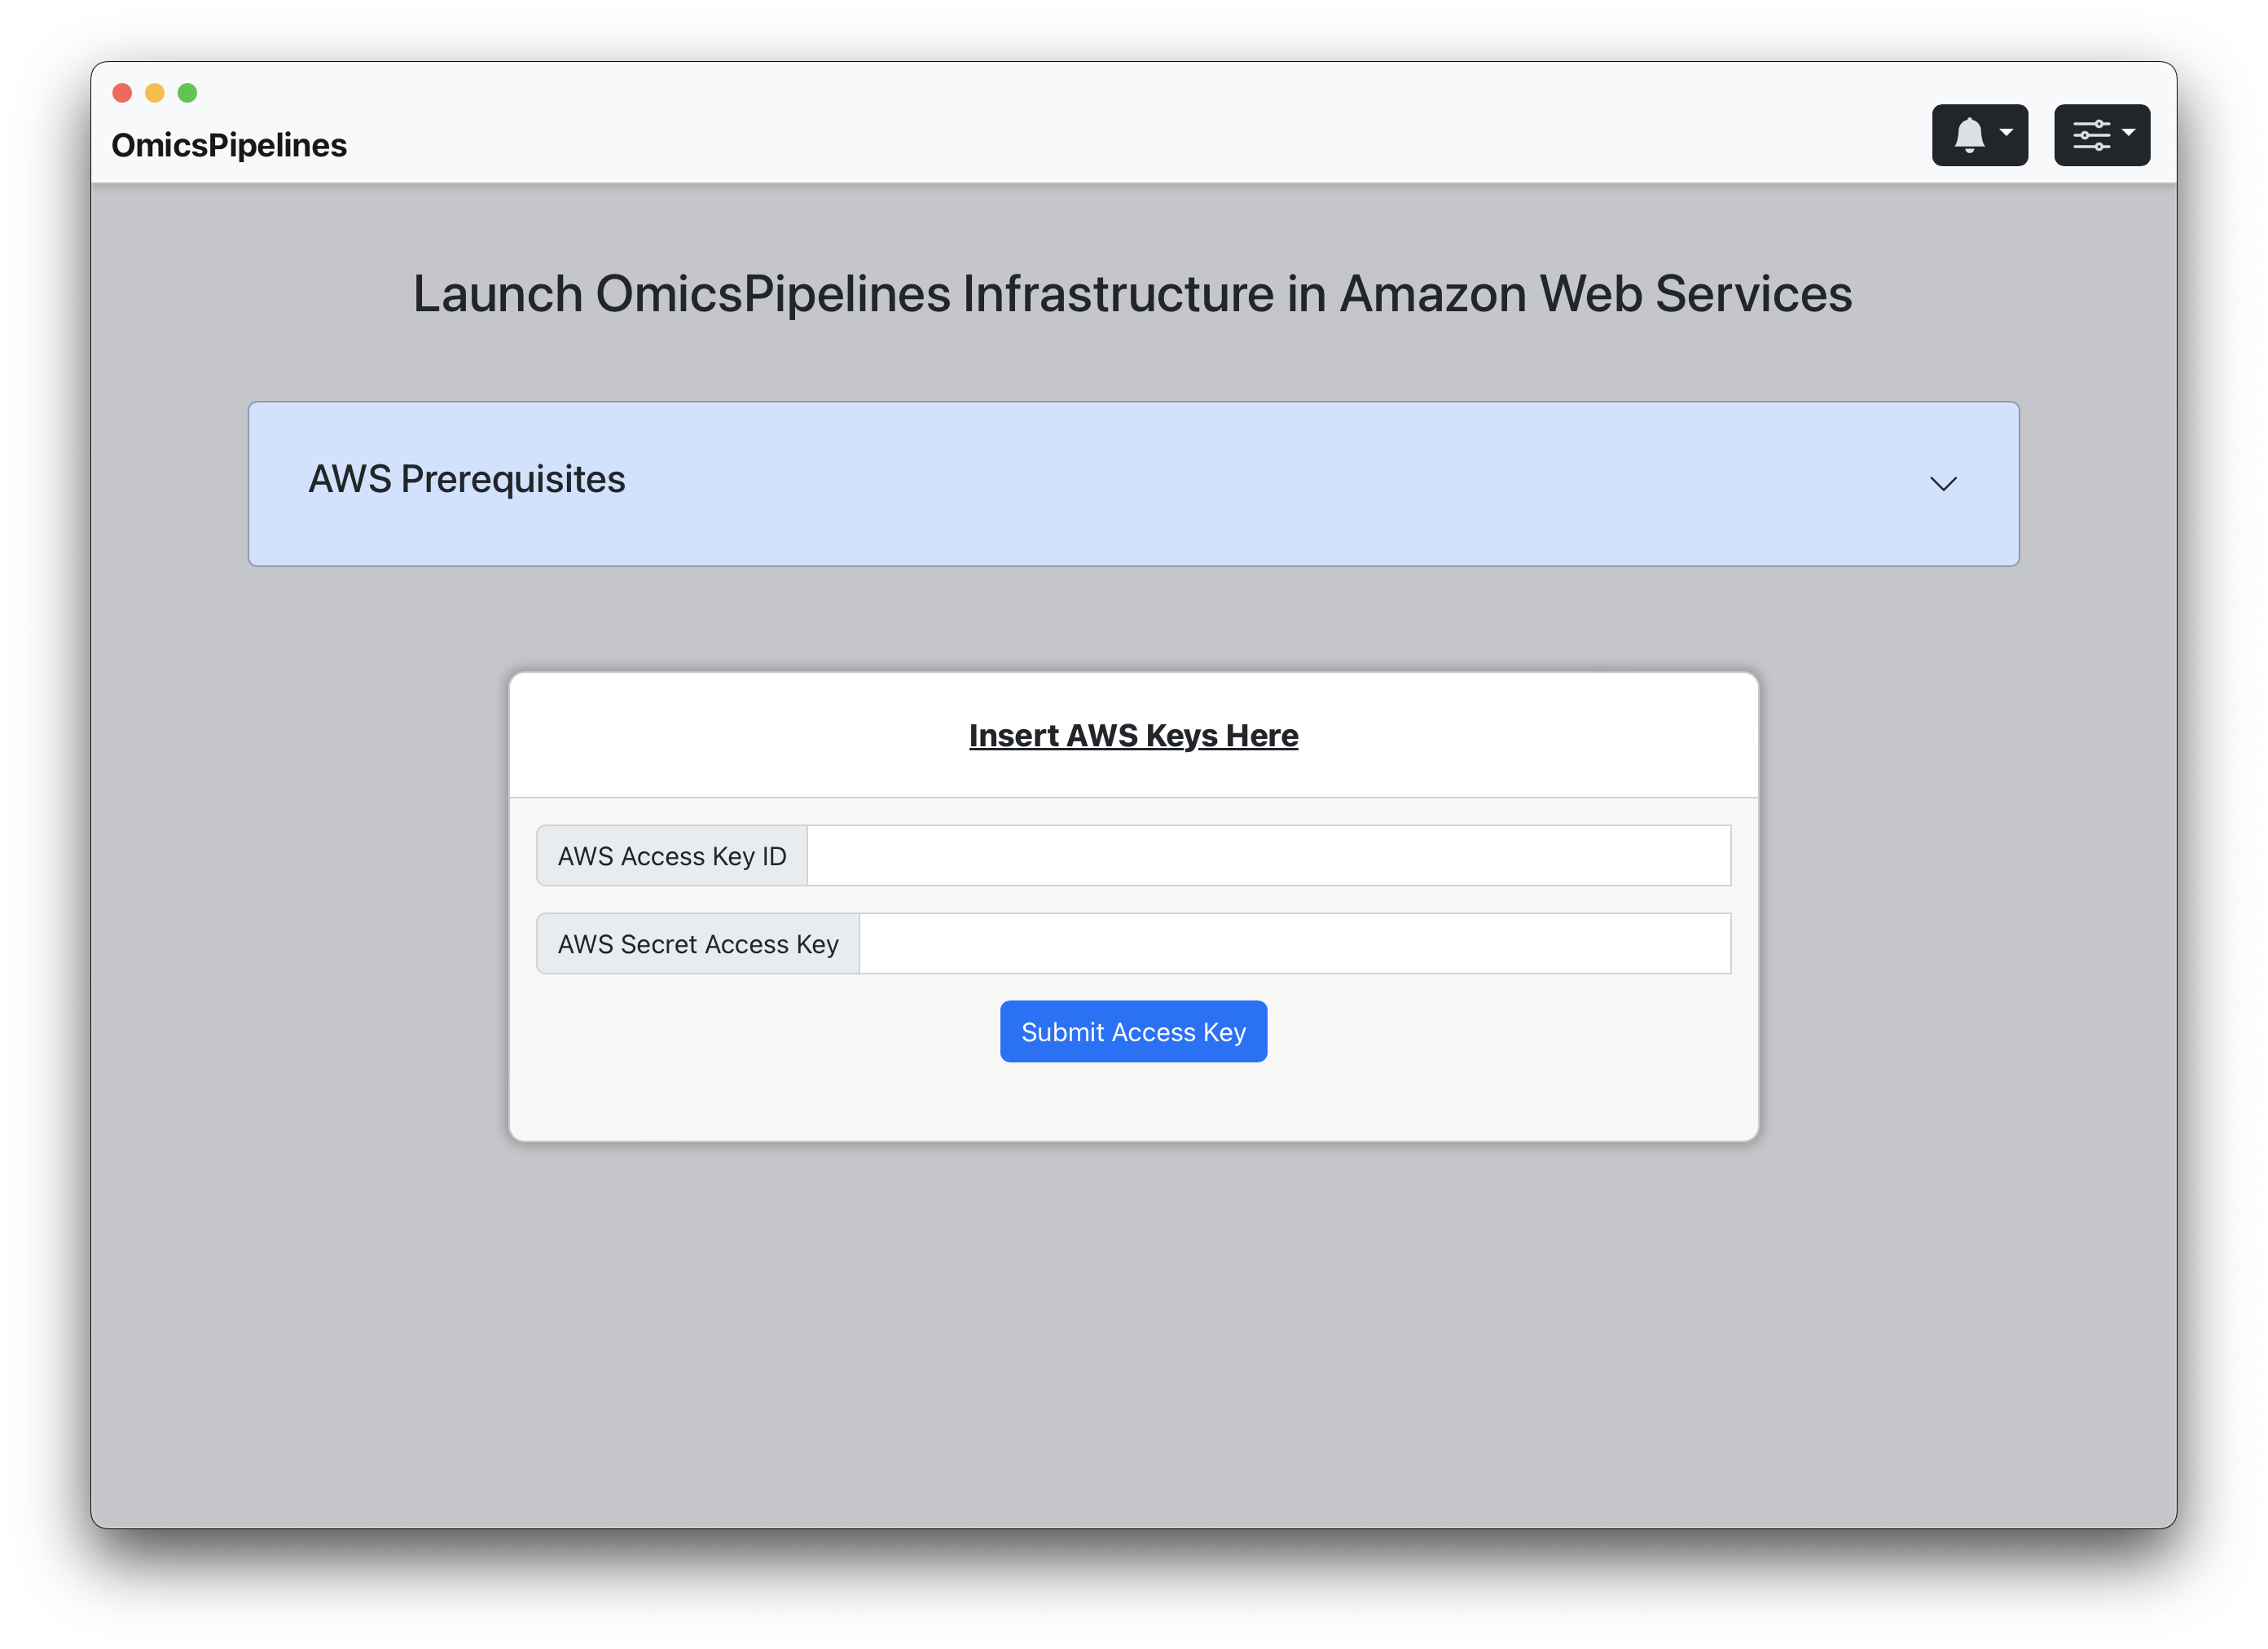
The AWS Access Key ID and Secret Access Key in the AWS setup screen
- Copy and paste these into the appropriate fields in the corresponding fields.
OmicsPipelines does not store or transmit your AWS credentials. They are saved to a file on your local machine in a
file at the path ~/.aws/credential* and are only used to access your AWS account. This file is also used by other AWS
tools such as the AWS CLI.
- This is shorthand for
C:\Users\username.aws\credentialson Windows,Users/username/.aws/credentialson Mac, and/home/username/.aws/credentialson Linux.
- Click 'Save' and you're done!
- Click on the file picker button in the middle of the screen.
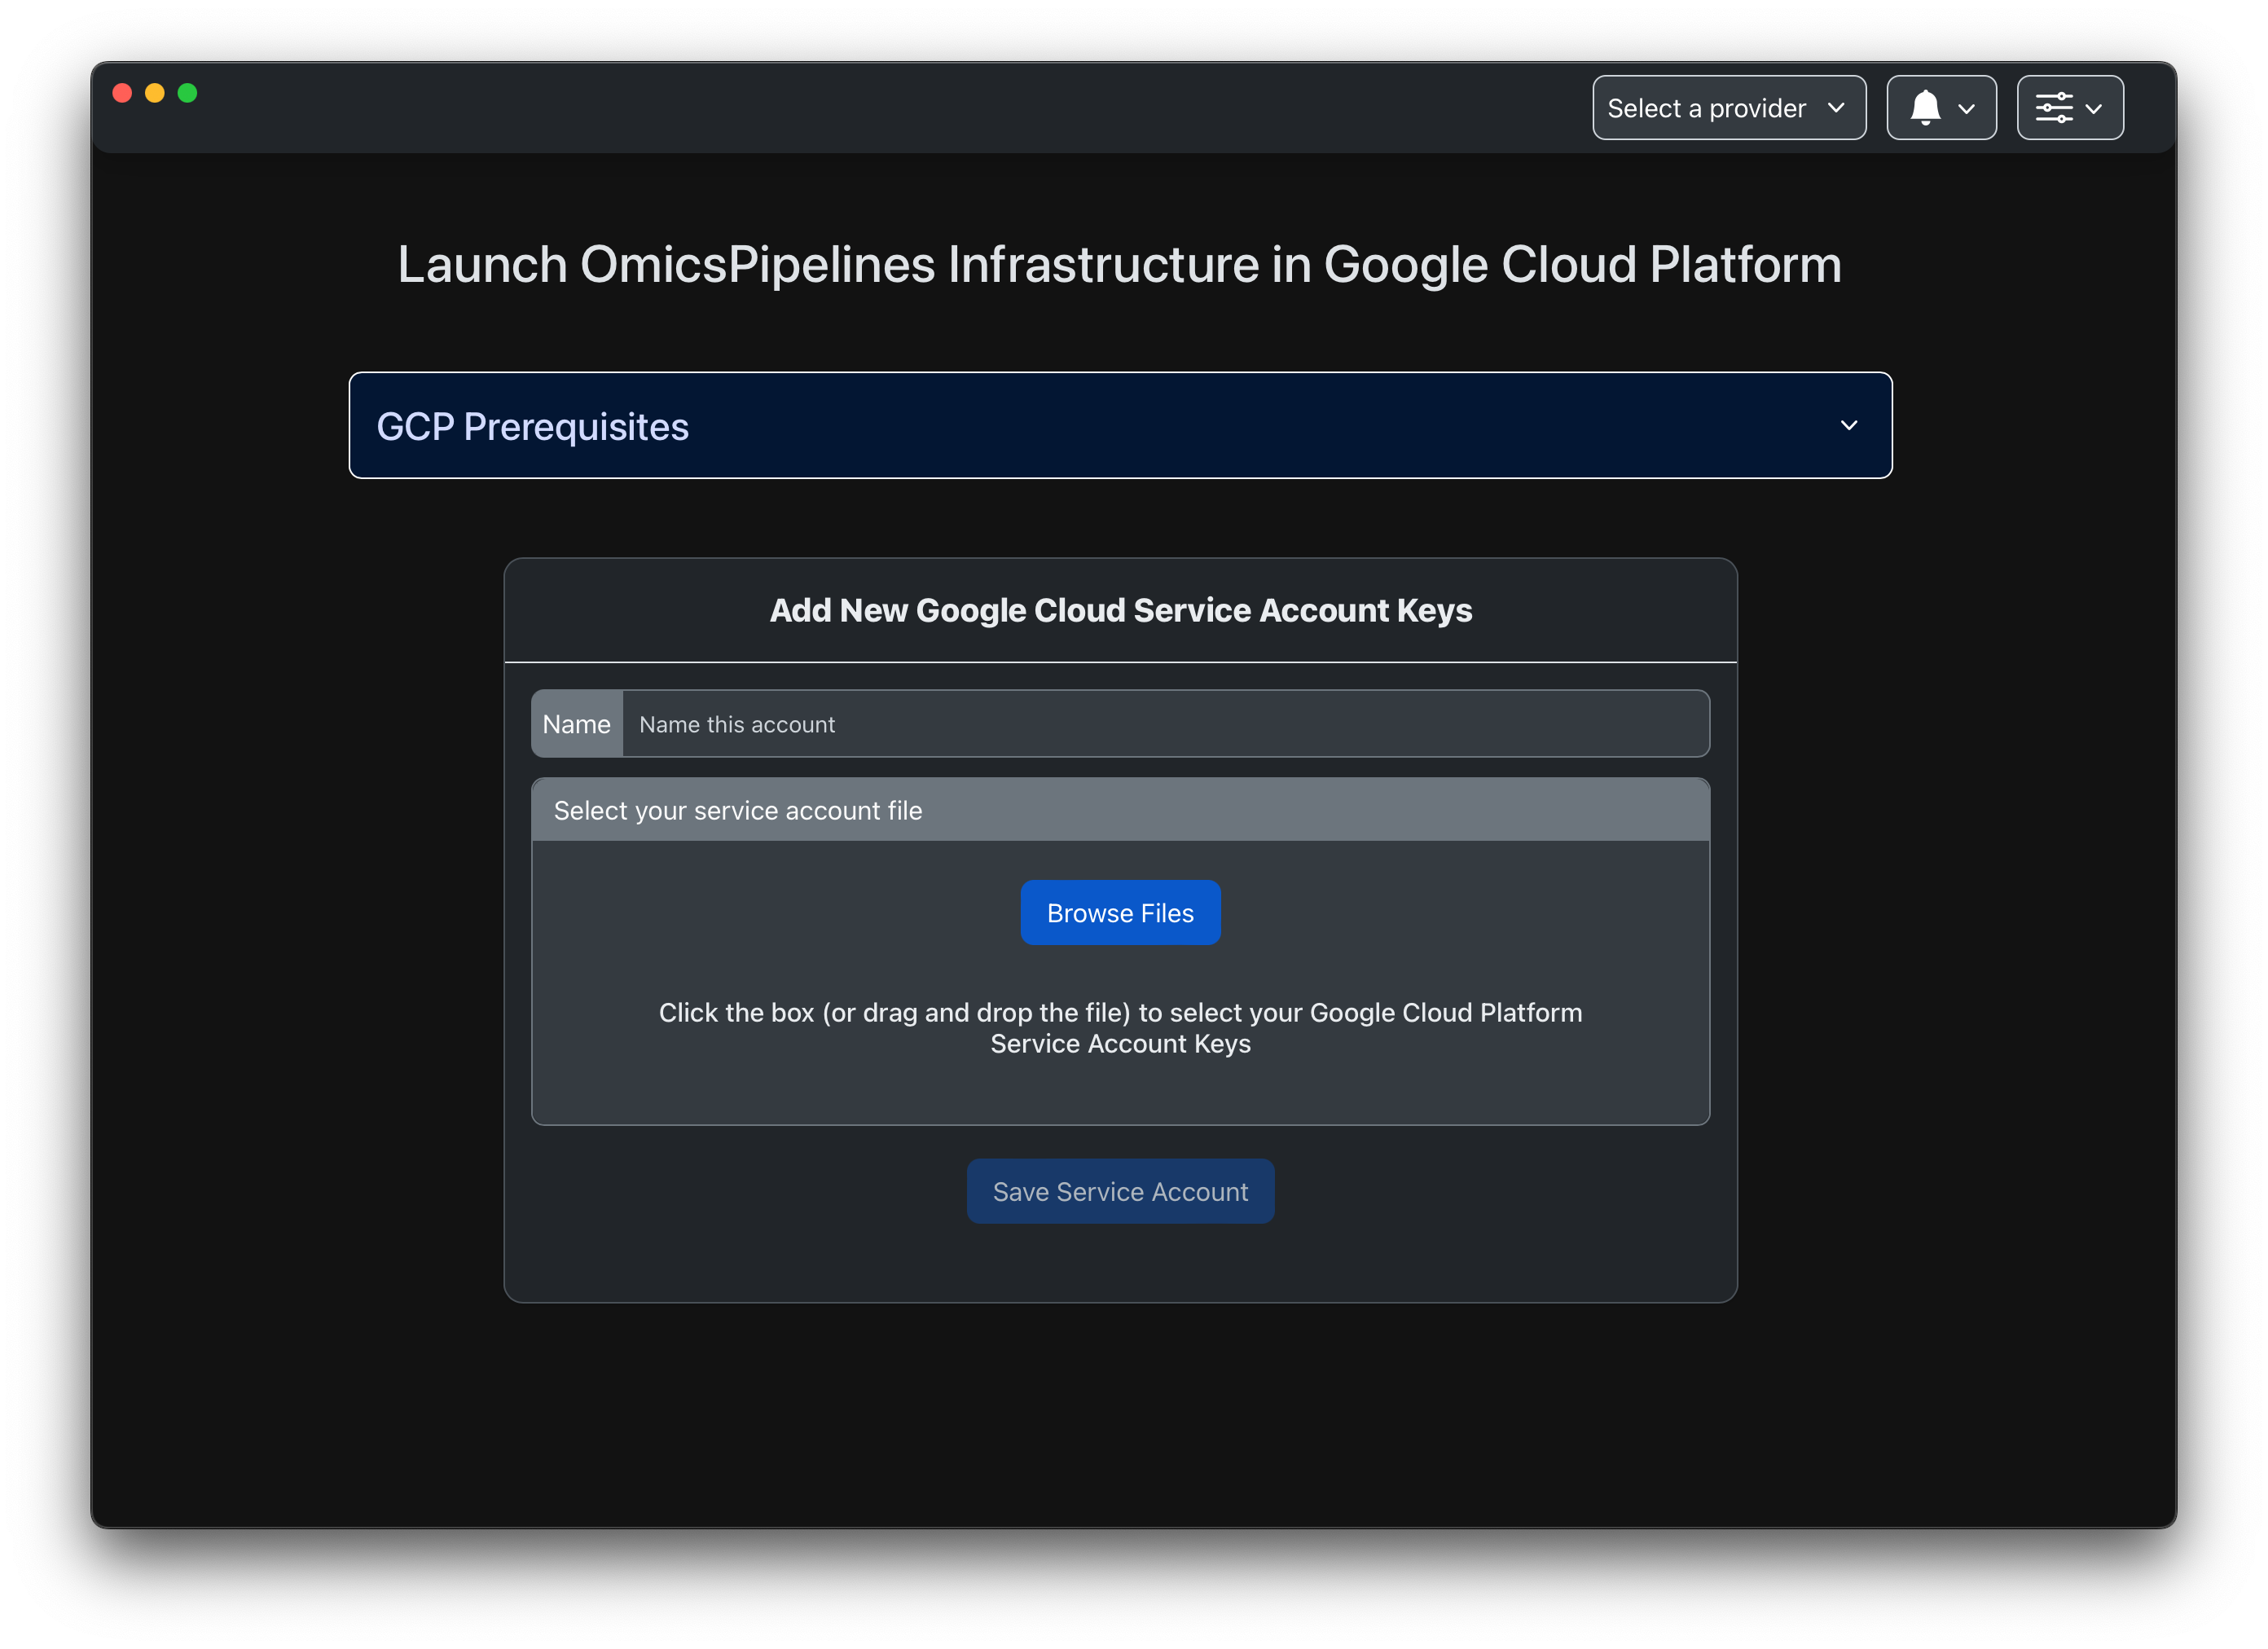
- Select the service account key file that you created in the steps above. You can also drag and drop files into the file picker.
OmicsPipelines does not store or transmit your GCP credentials. They are saved to a database on your local machine
associated with the OmicsPipelines application. On Mac, this is in the ~/Library/Application Support/OmicsPipelines/ directory.
- You're done!
Change cloud provider accounts
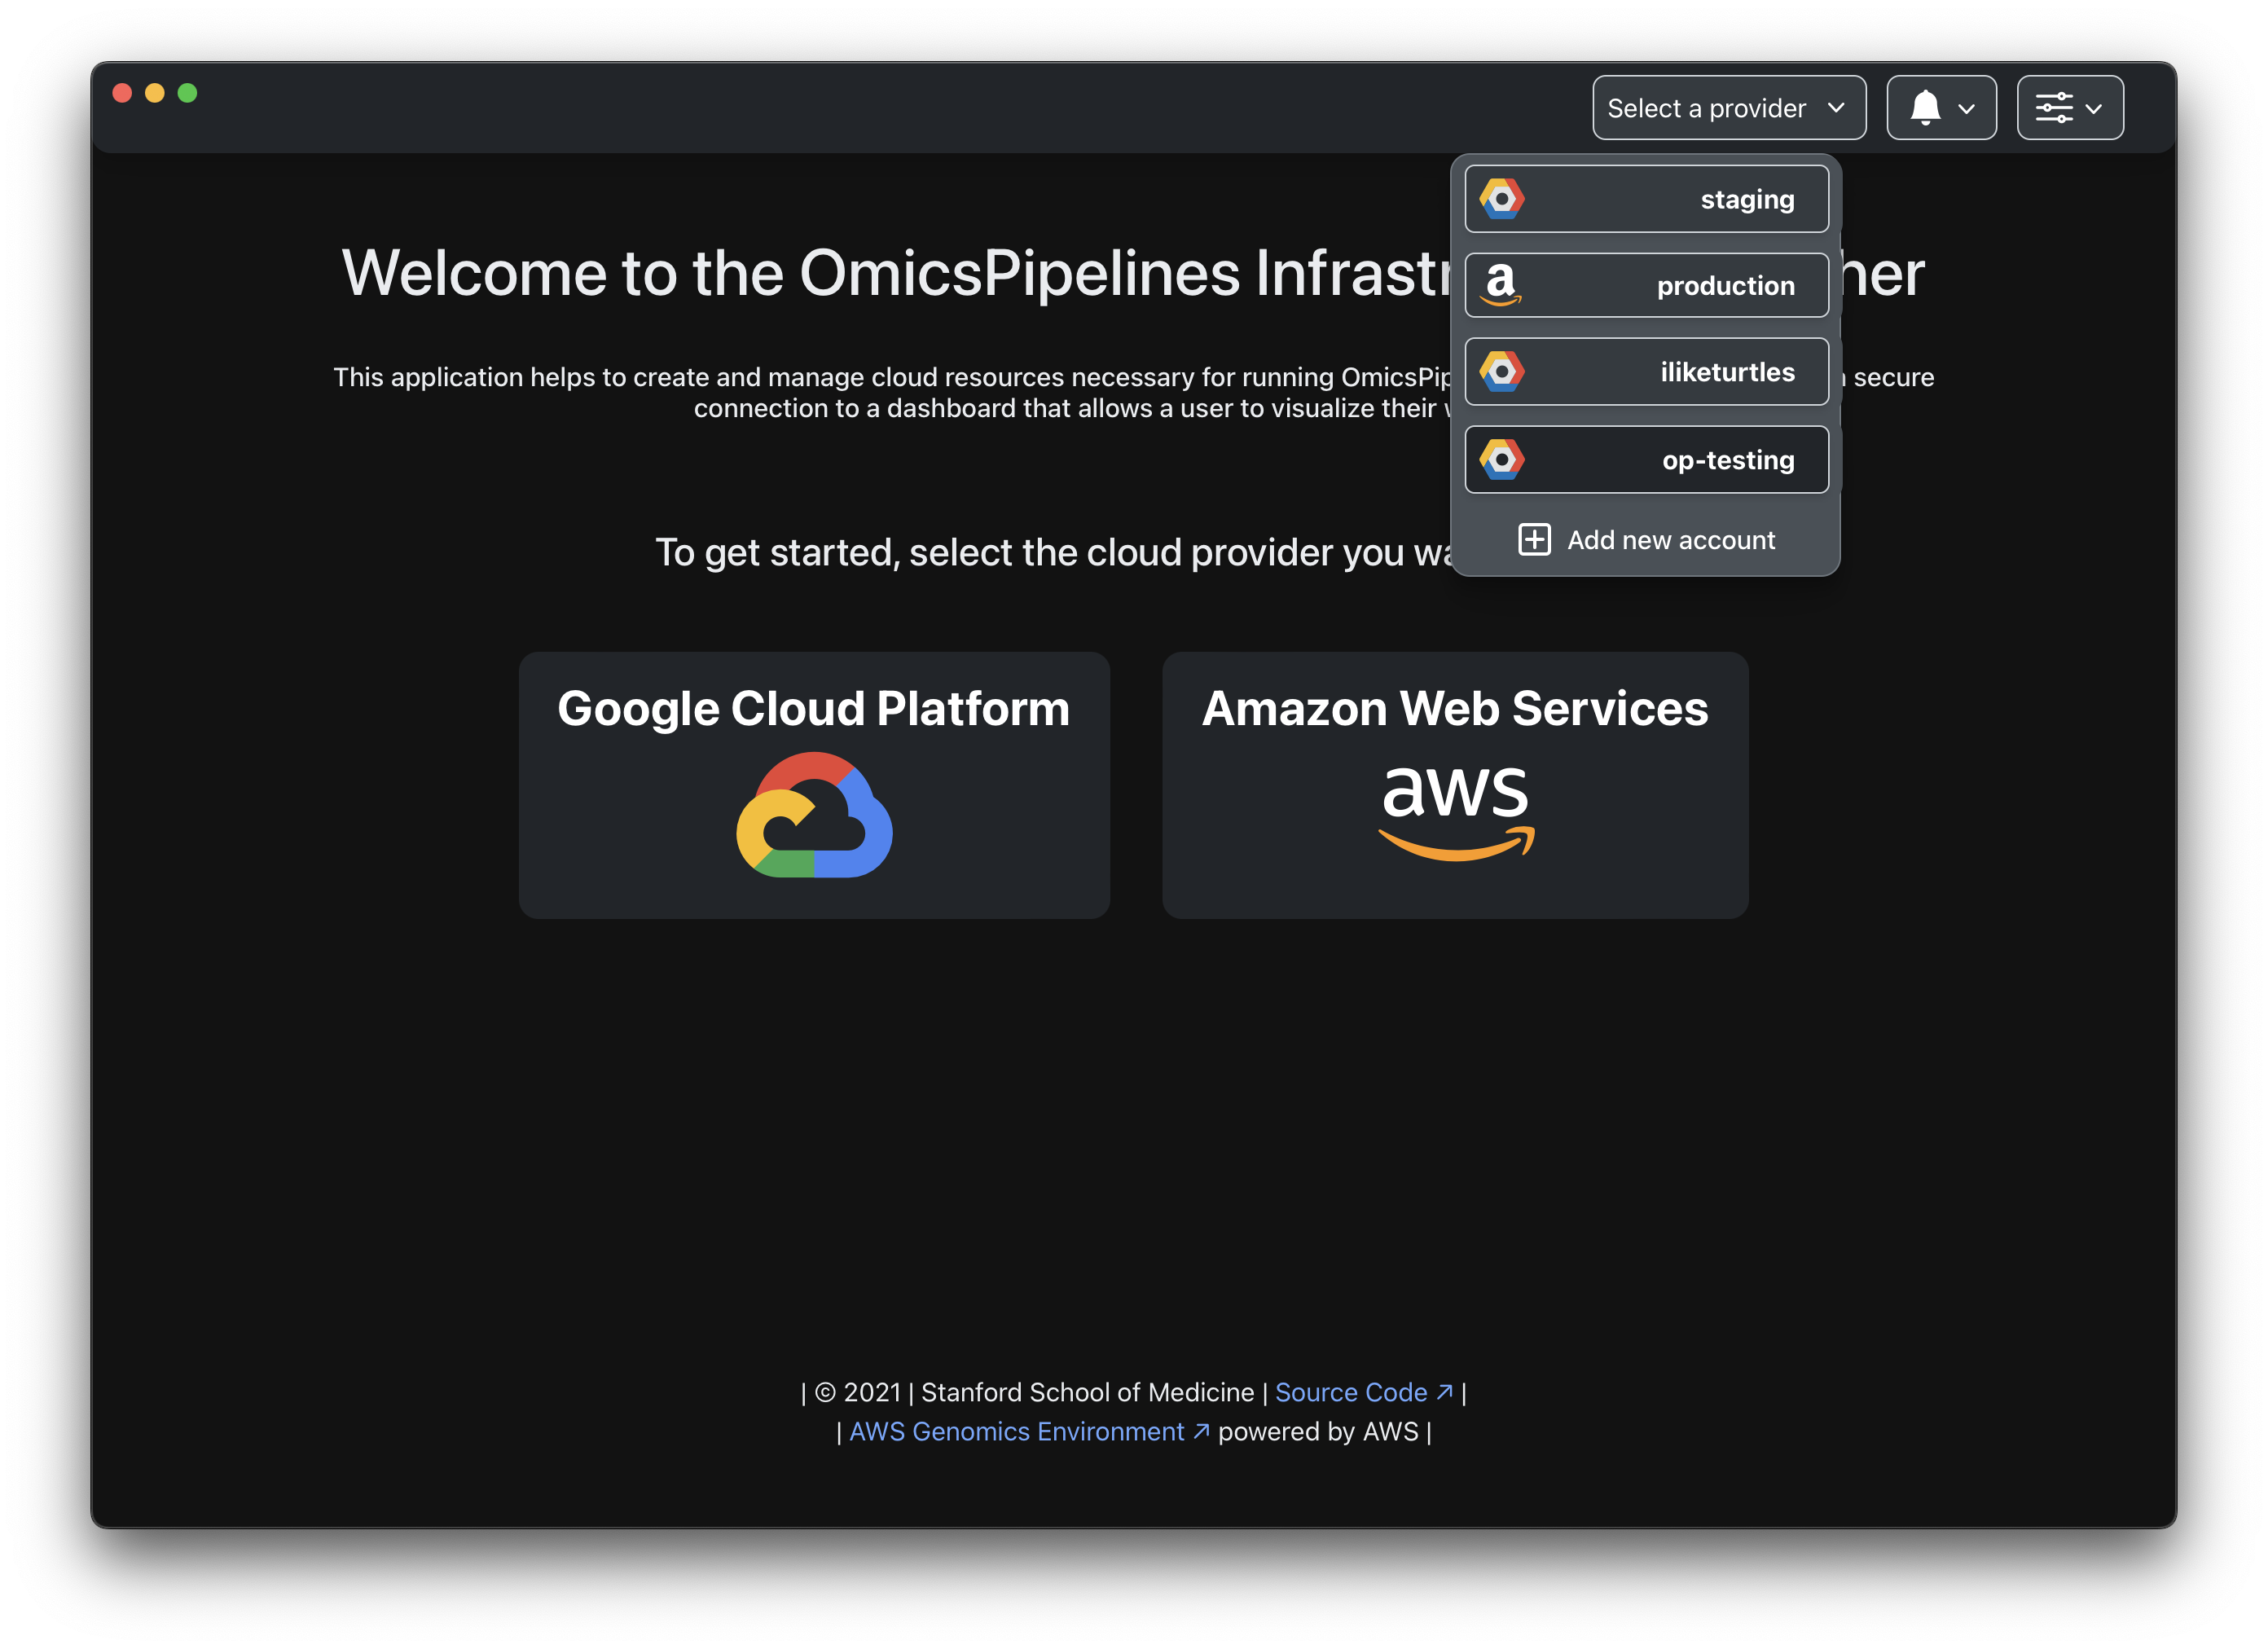
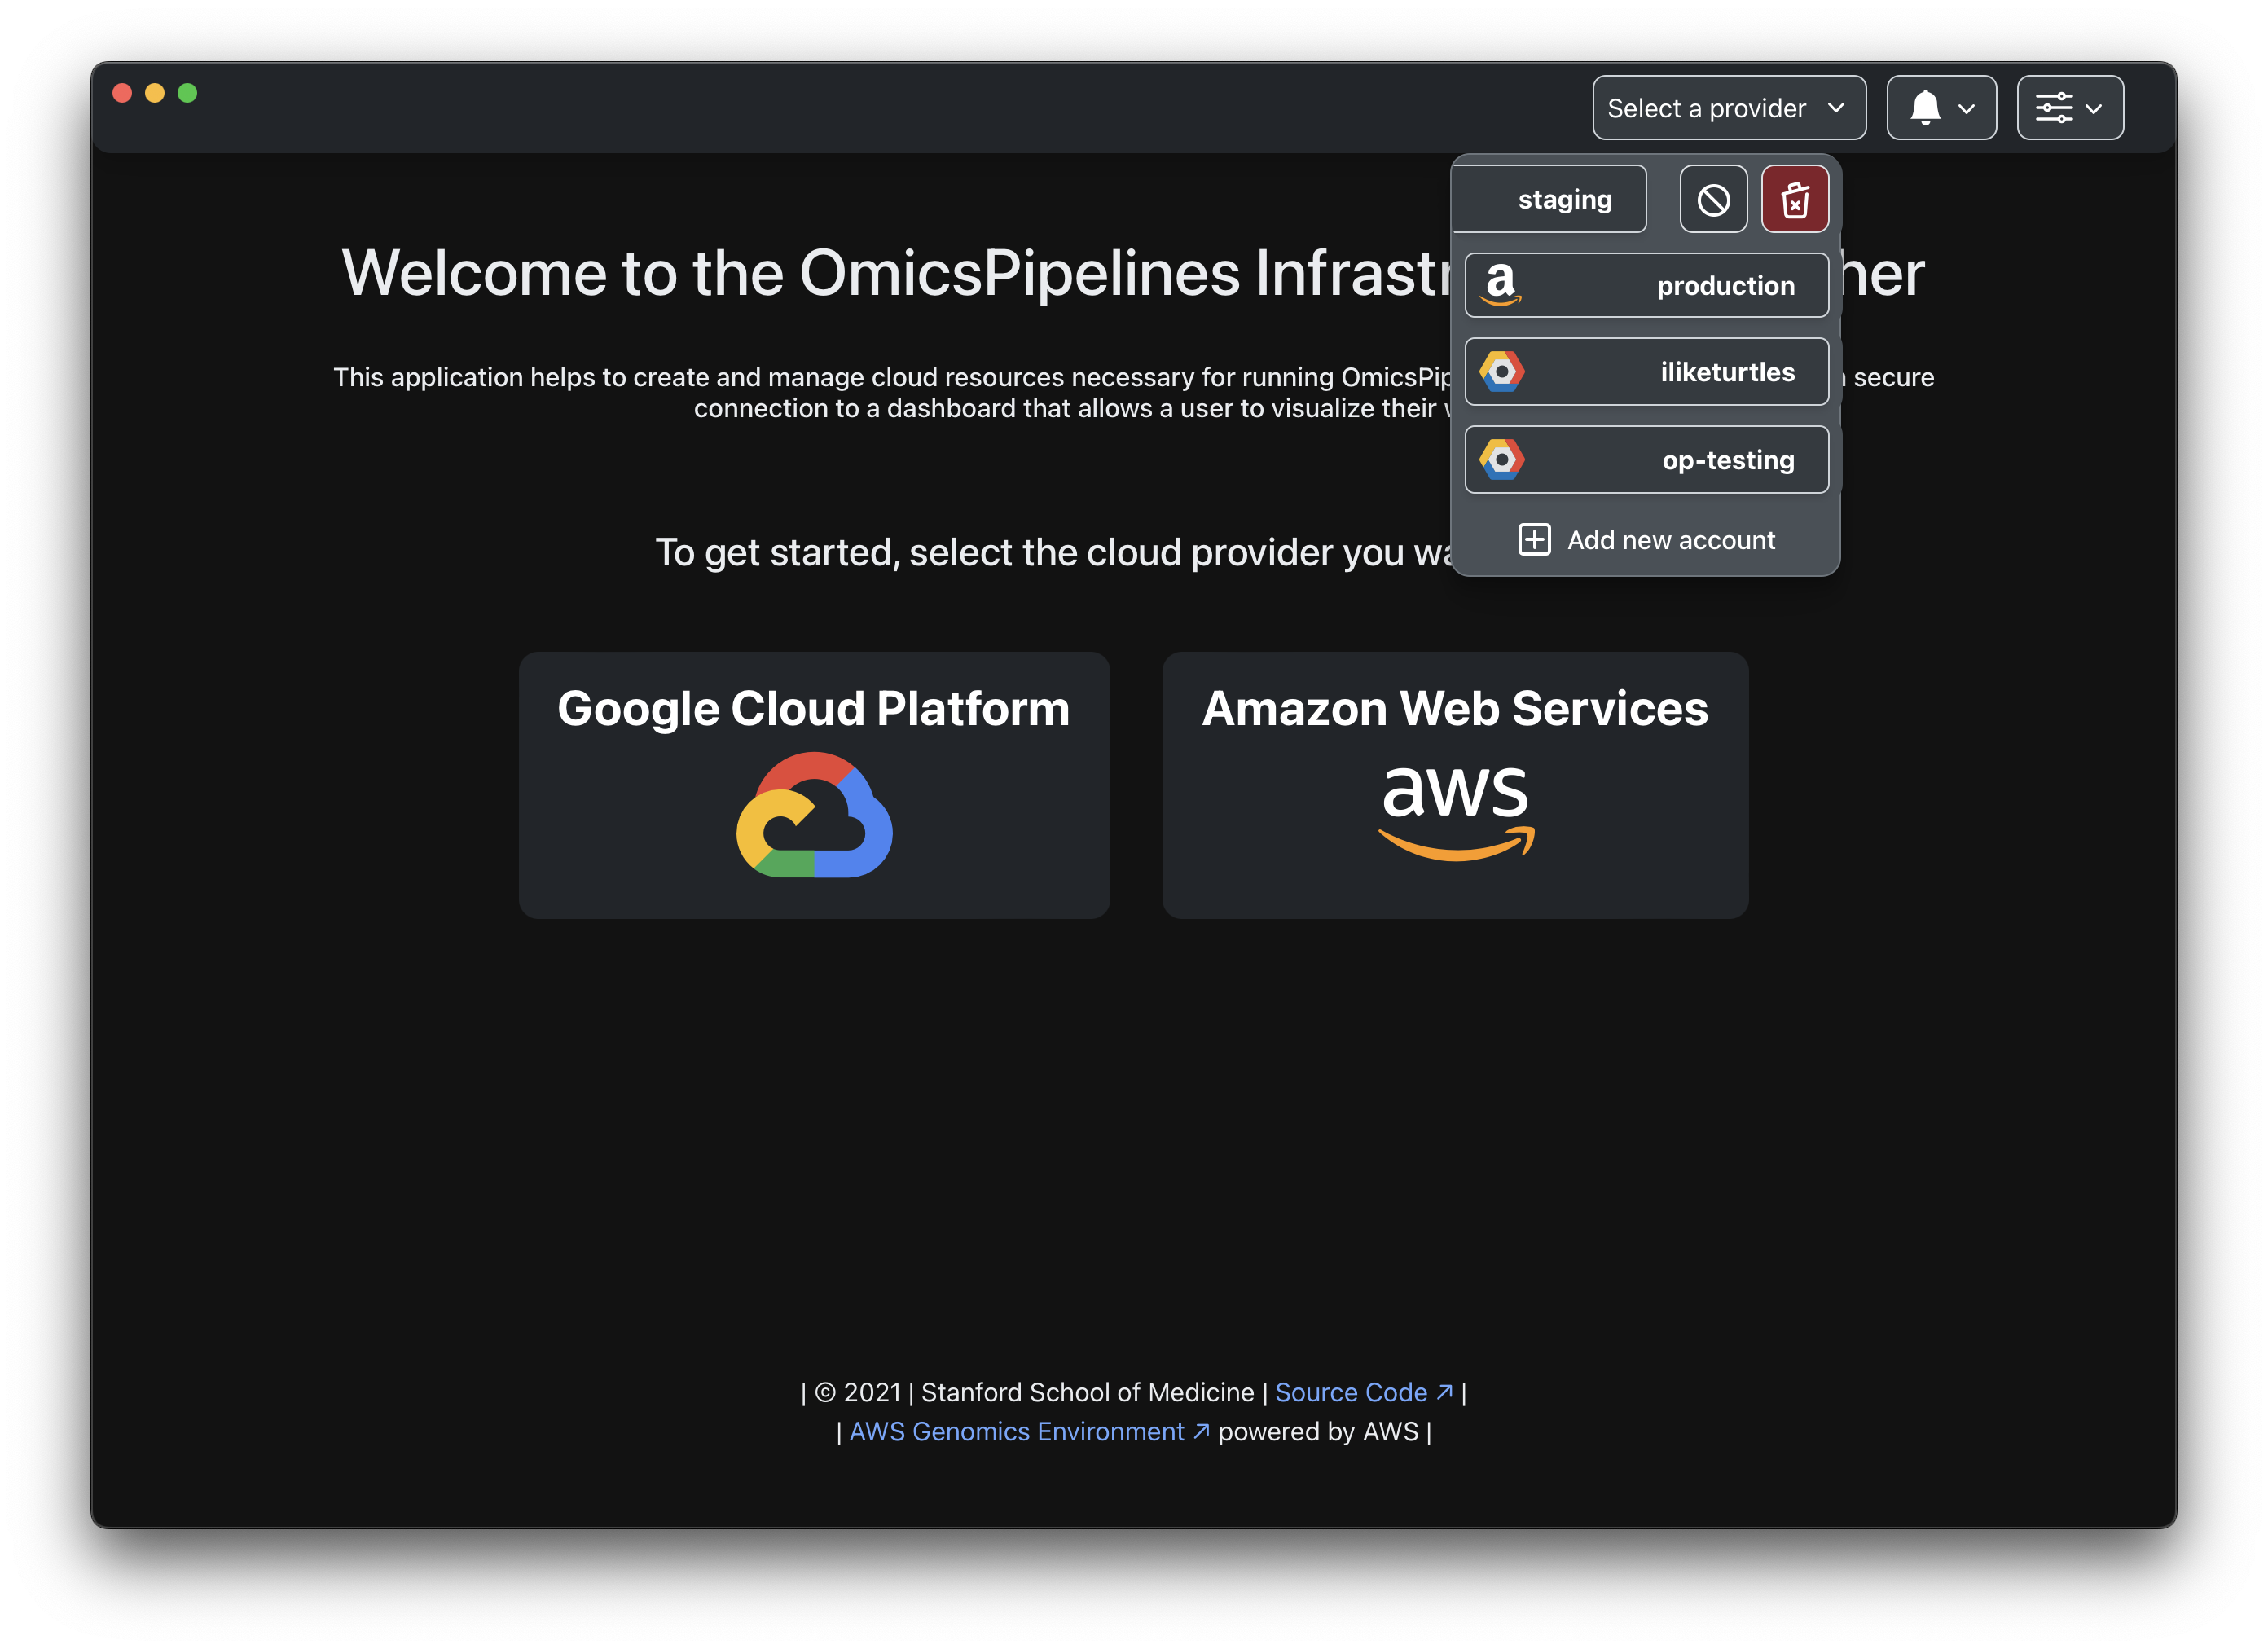
Change cloud providers accounts by clicking on the cloud provider button in the top right corner of the application.
Add additional cloud provider accounts
You can add additional cloud providers by clicking on the cloud provider button in the top right corner of the application.
Clicking on the Add new account button will redirect you to the home page, where you can select a new cloud provider.
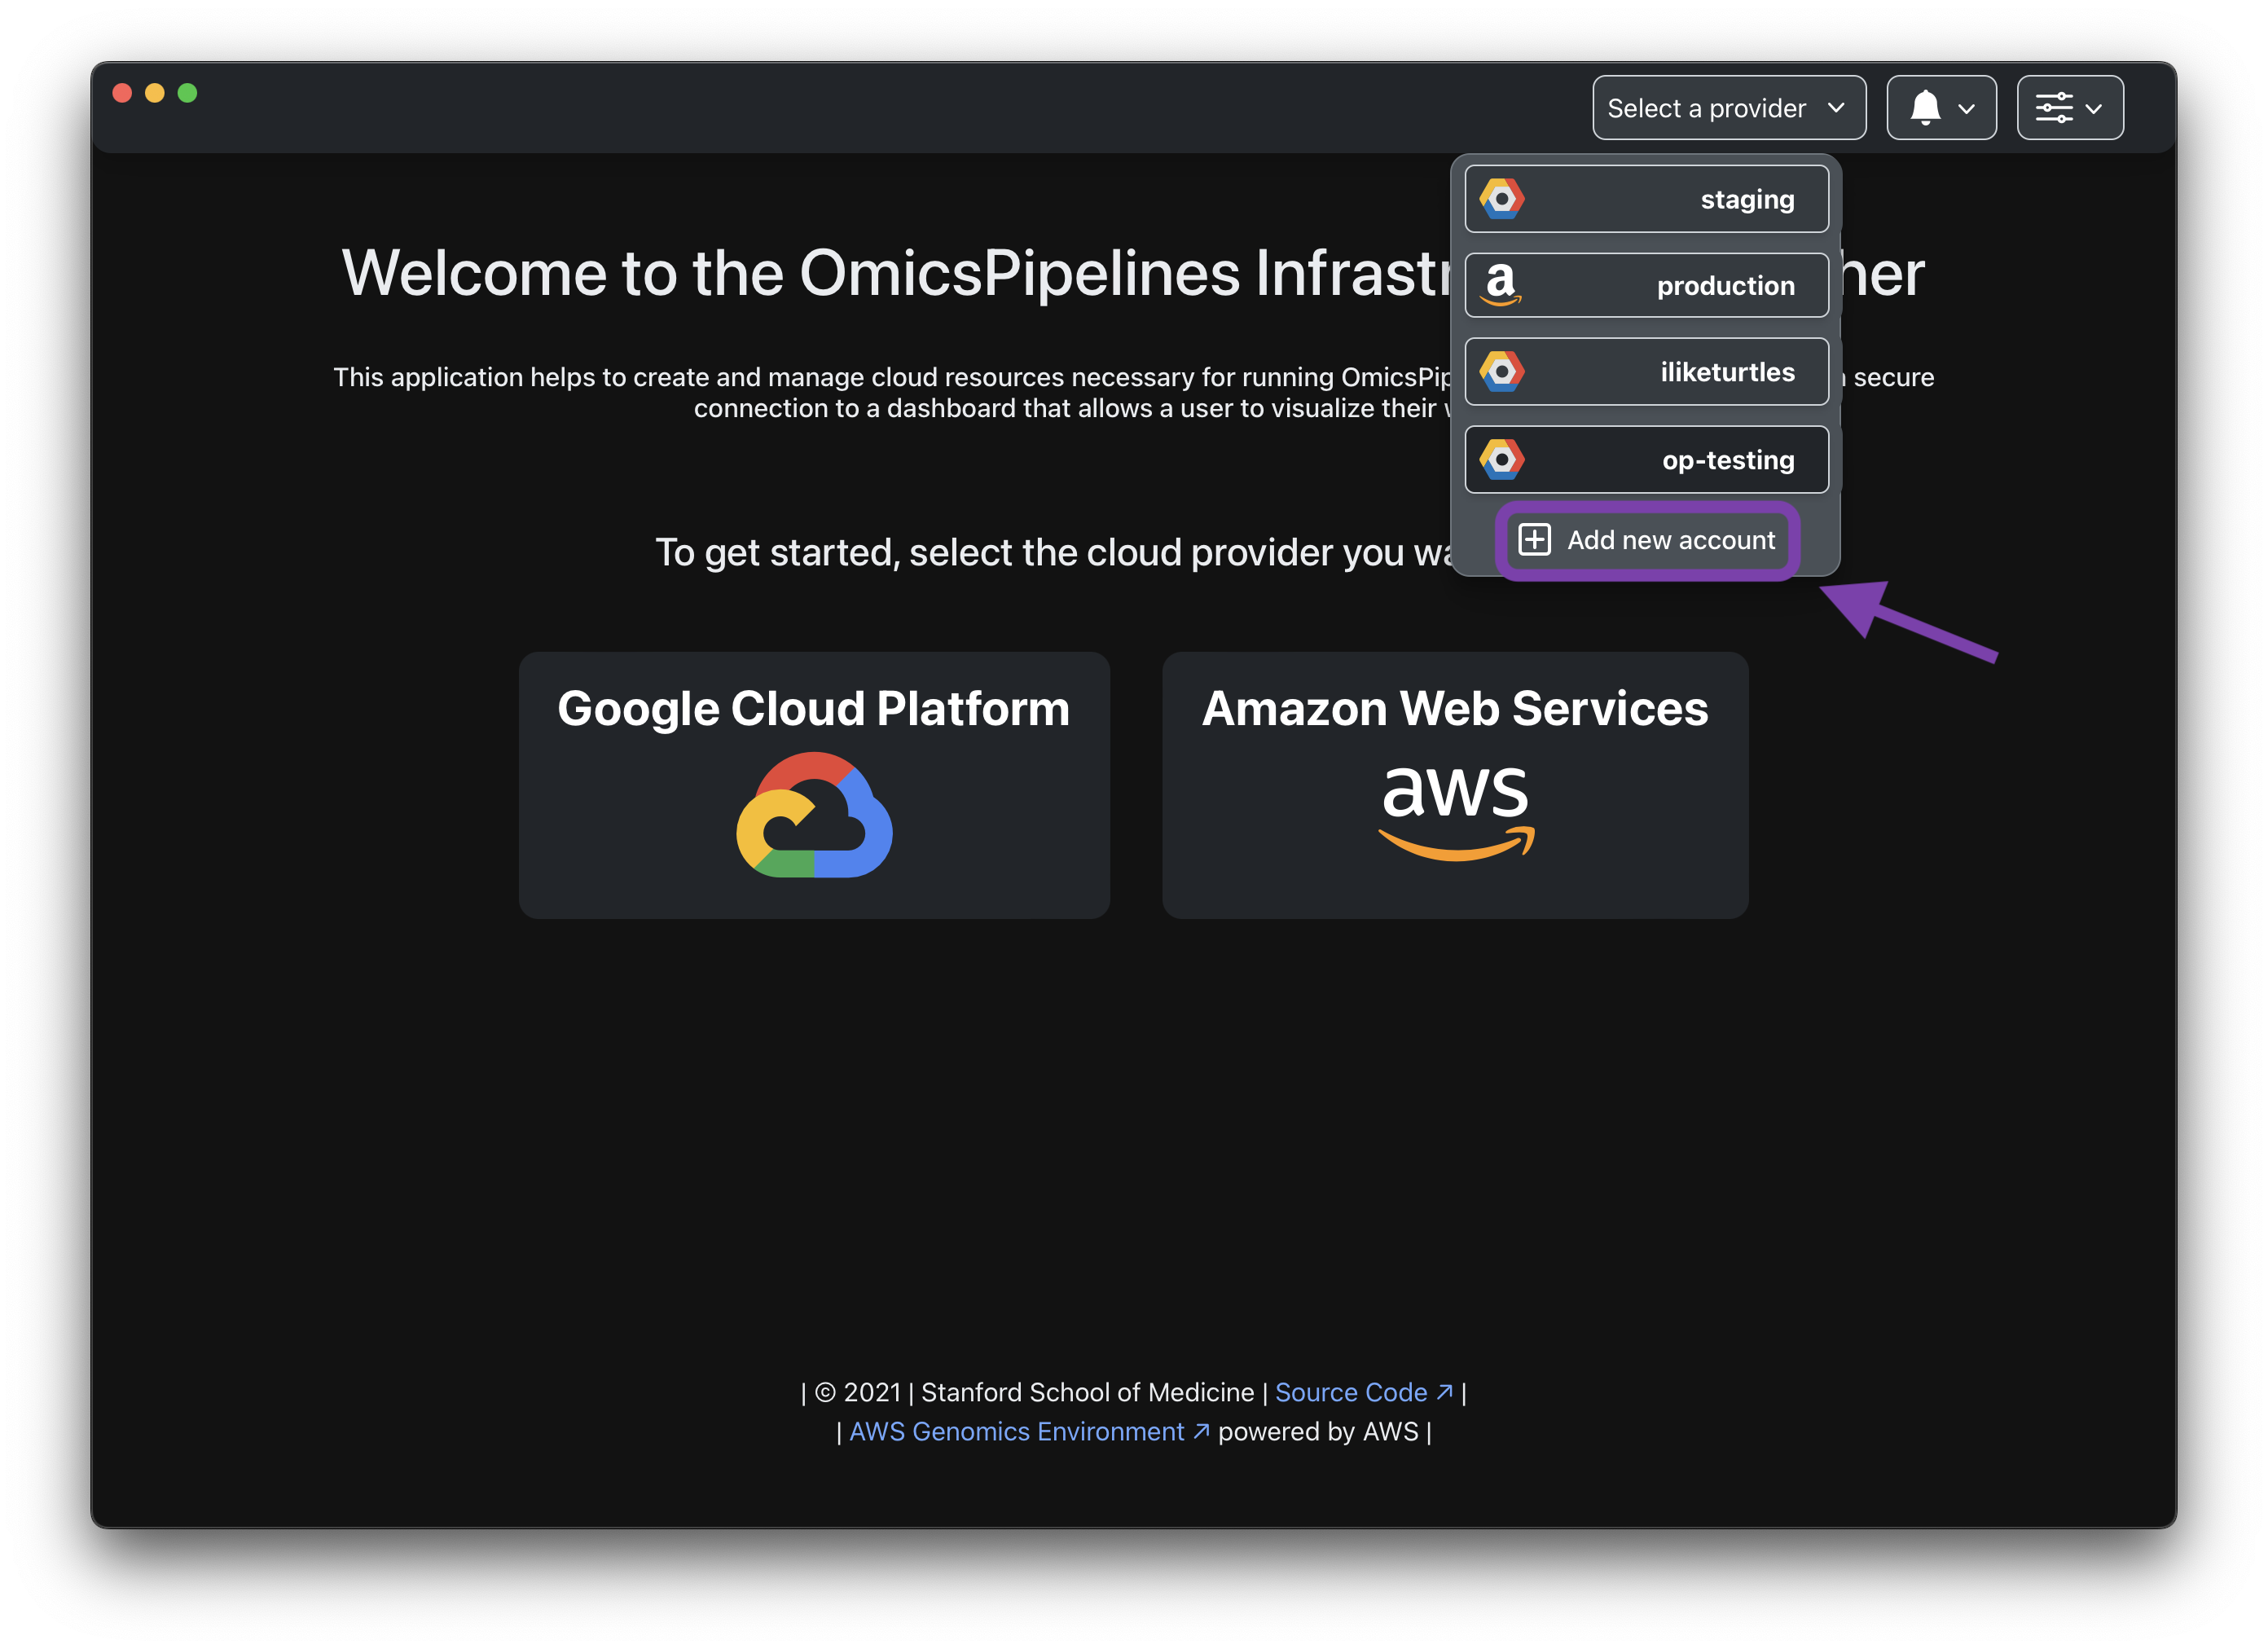
You can add multiple cloud providers, and multiple accounts within each provider to OmicsPipelines at the same time.
Remove cloud provider account
Currently active cloud provider accounts
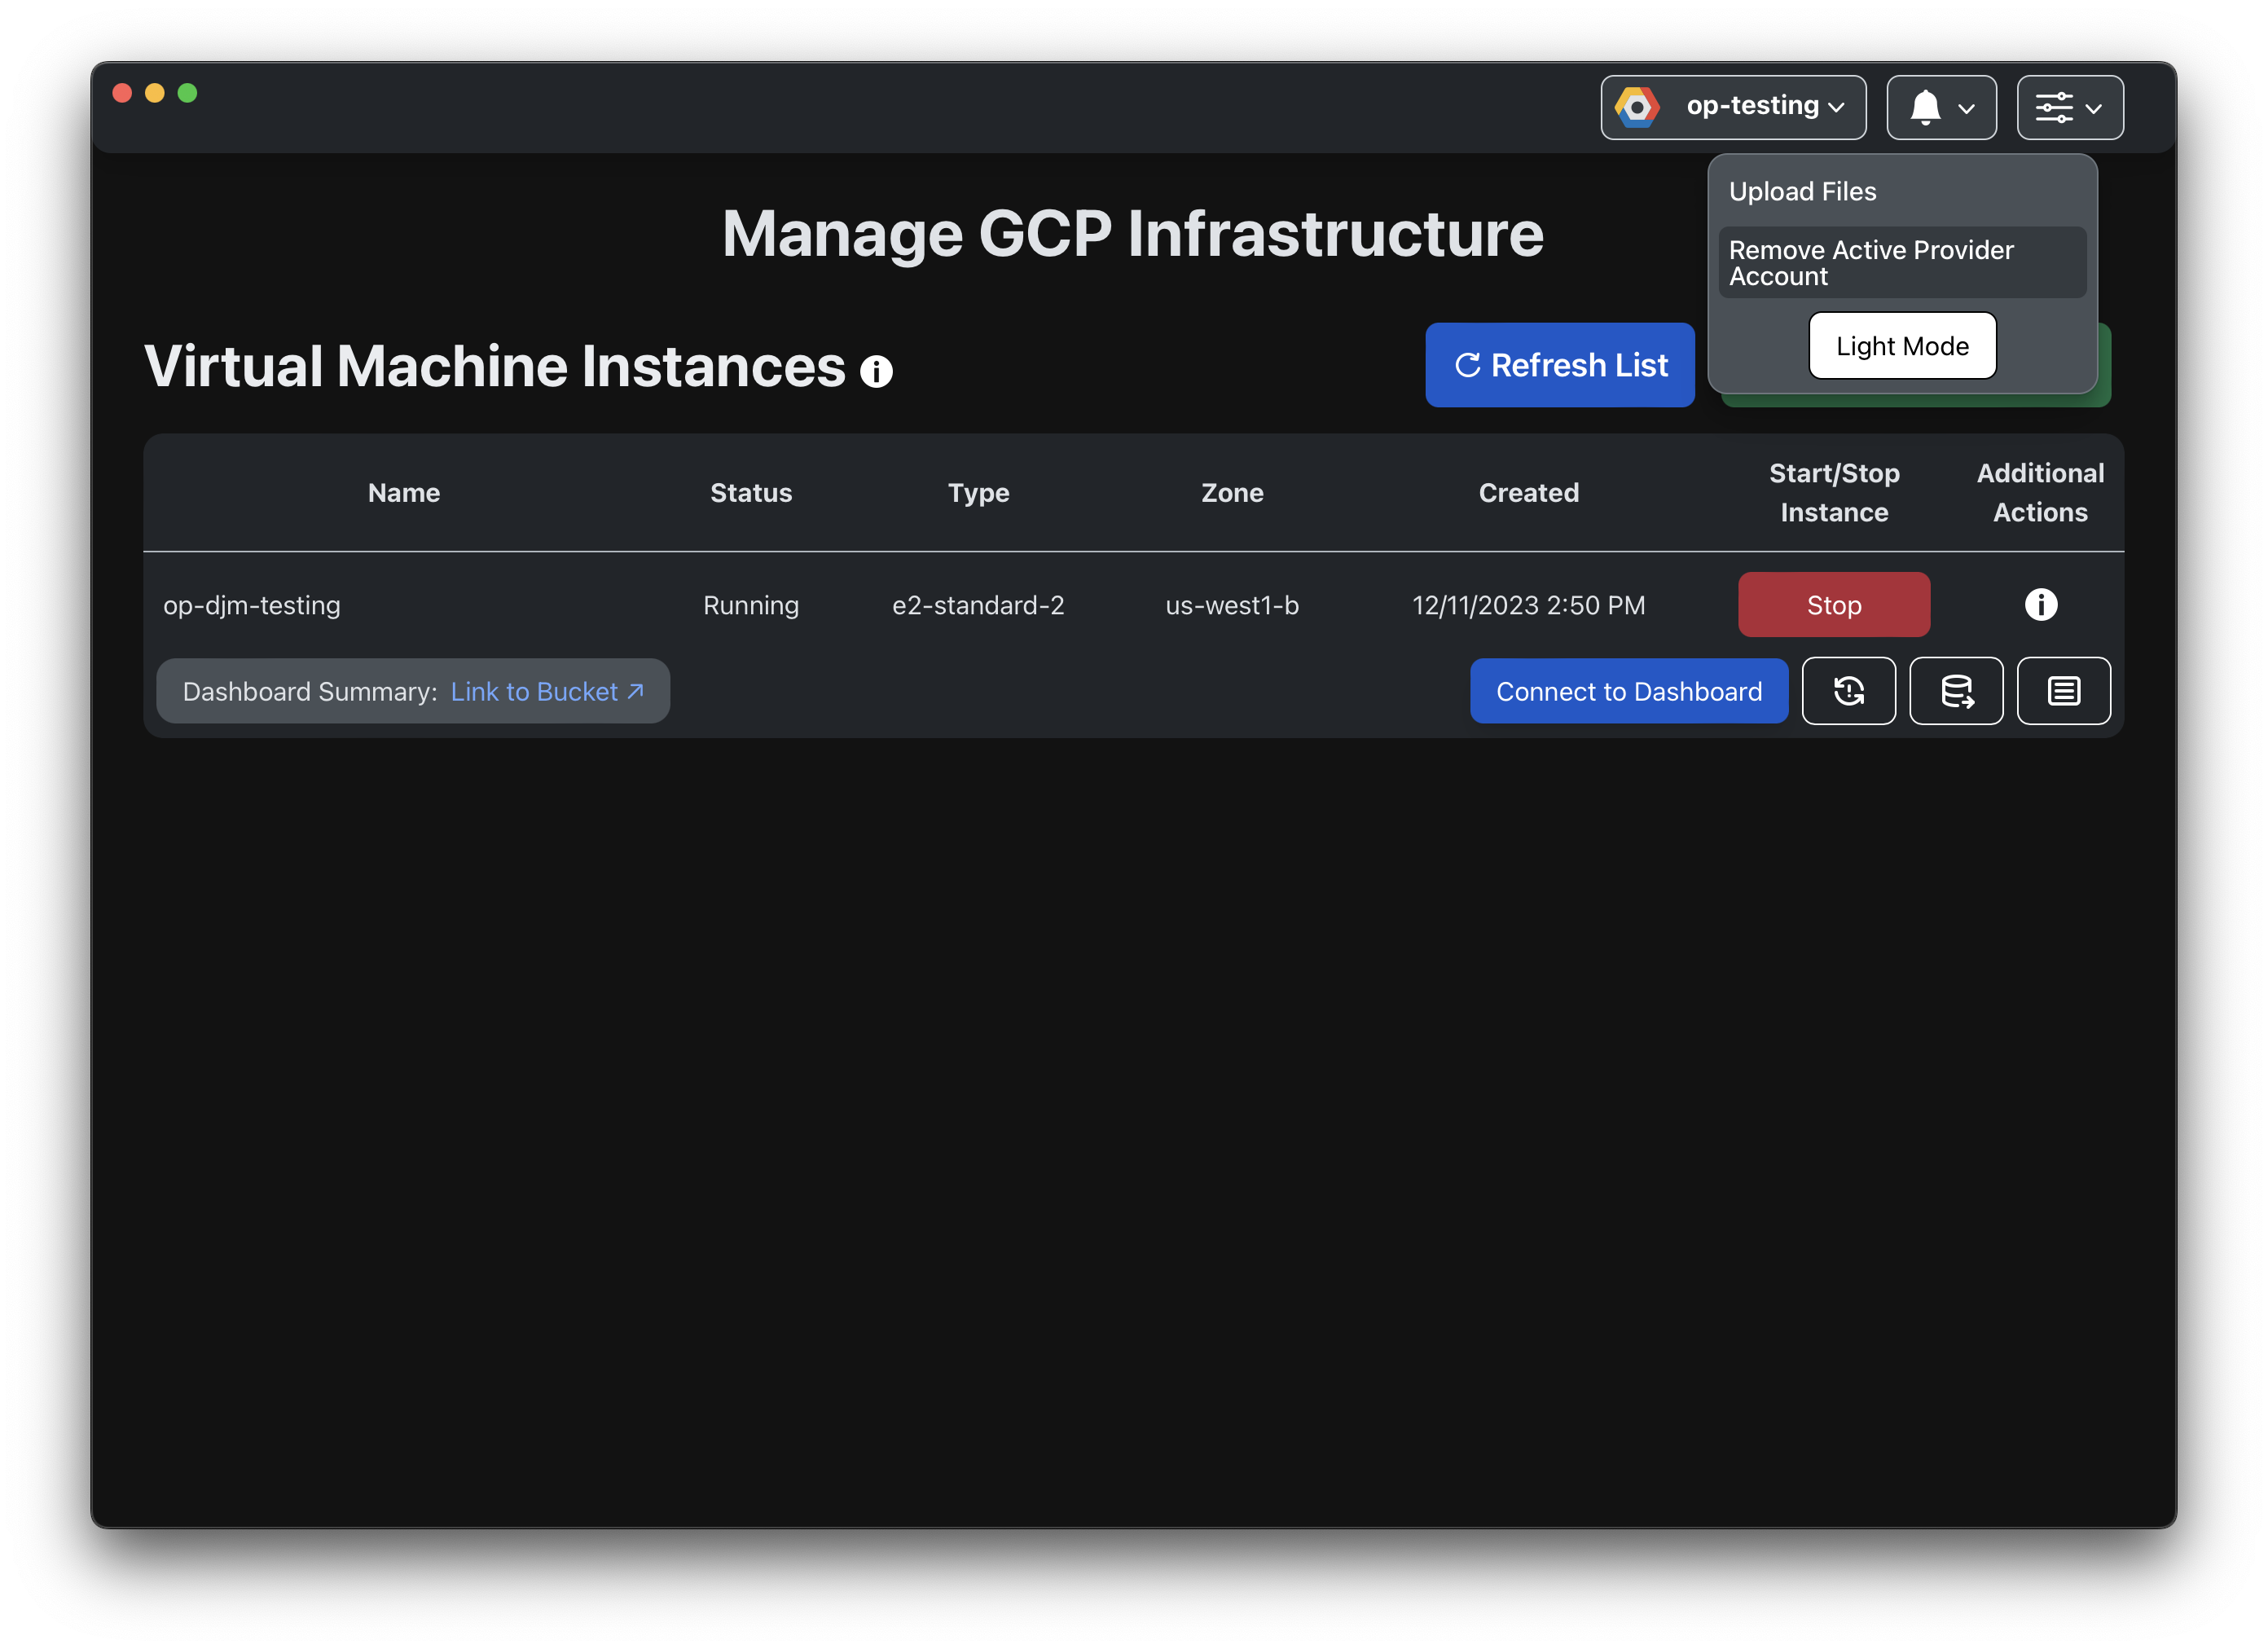
You can log out and remove a currently active cloud provider account by clicking on the Options (⚙️) button in the top right corner of the application.
Other cloud provider accounts
You can remove other provider accounts, as well.
Start by clicking on the cloud provider button in the top right corner of the application.
Right-click on the account you want to remove and select the 🗑️ icon. If you're on a laptop or a Mac without
right-click enabled, you can use Ctrl (⌃ on Mac) + Click to right-click.
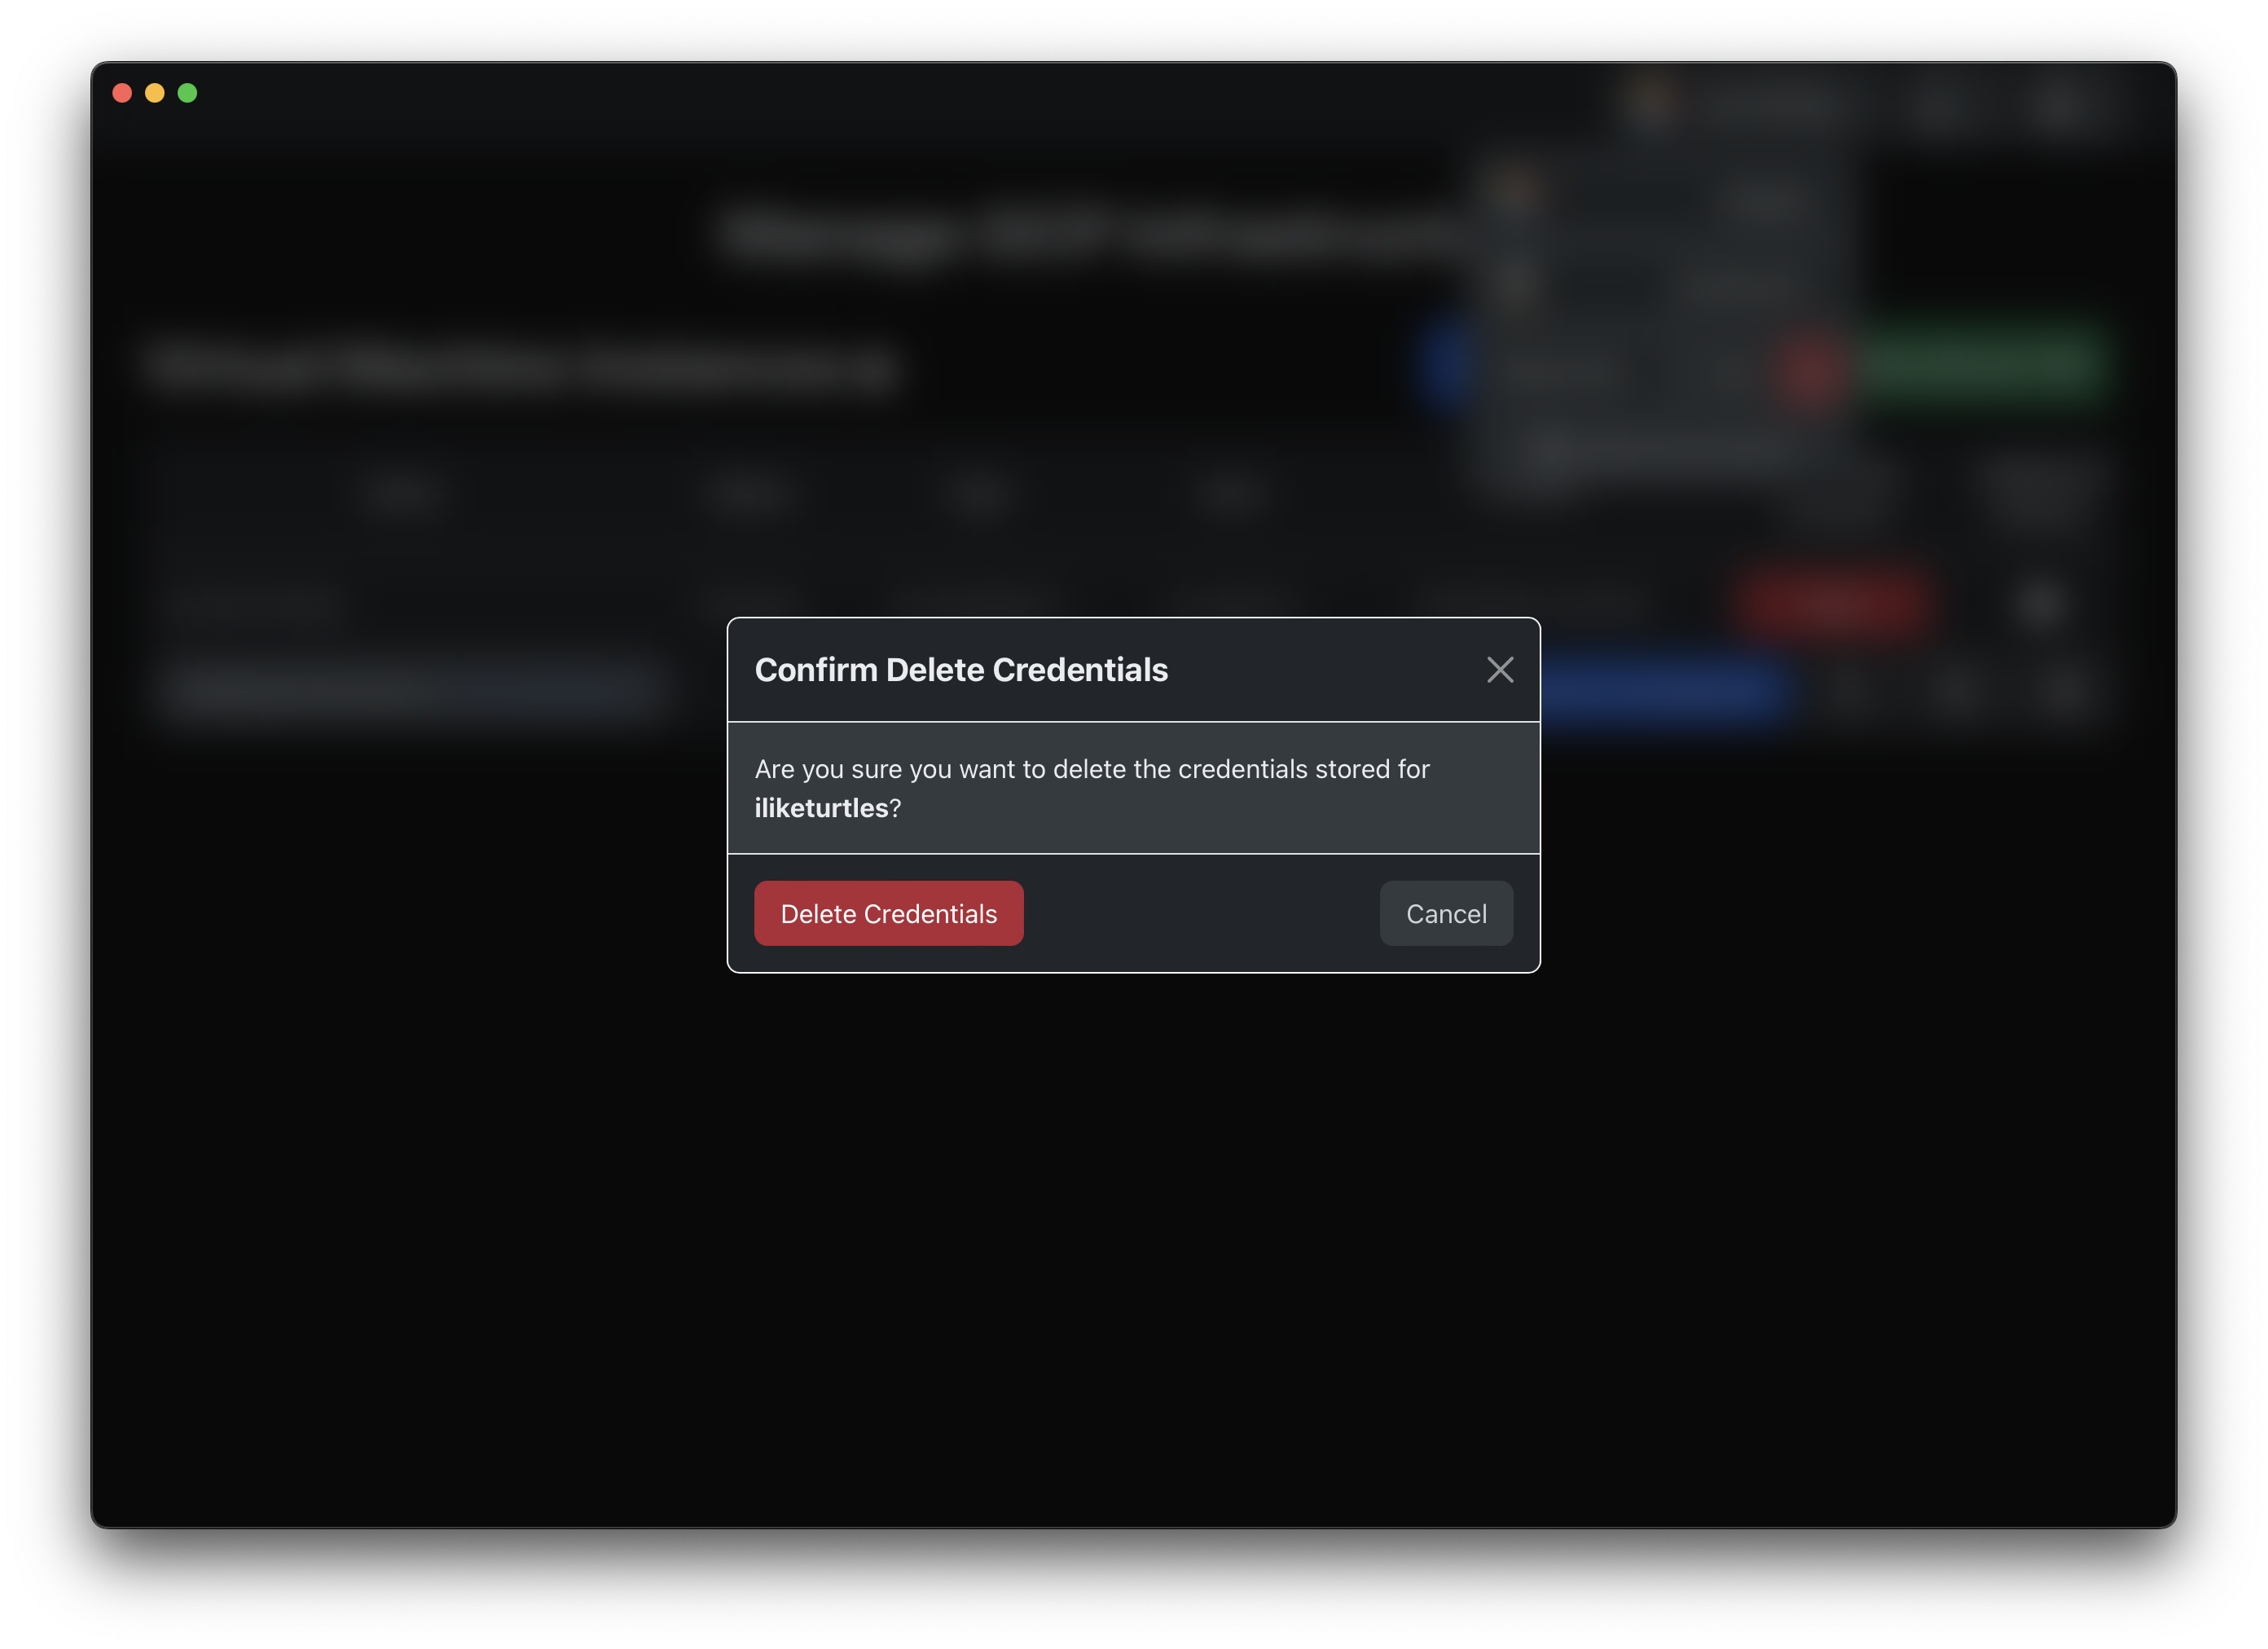
Confirm that you want to remove the account by clicking Delete Credentials.
Next Steps
Now that you have set up your cloud provider, you can start to learn about OmicsPipelines dashboards. Check out how to view infrastructure section to learn more.